Building structures
A Block is an object that can be used to create structures on bases. It is a cube or rectangular prism consisting of three dimensions, length, width, and height, and it can use any of the textures that are listed in the base.cfg file (Orbiter\Config\base.cfg), although some may not be appropriate for a block.
The description of a block is written into the config file of a base (Orbiter\Config\<Planet>\Base\<BaseConfig.cfg>).
Textures
Textures used for building a block are found in the directory Orbiter\Textures and are listed in the file Orbiter\Config\Base.cfg. Note that there are a number of textures in the \Textures directory that are not listed in the Base.cfg file that could be used, so, if you like type in the filename without the extension into the Base.cfg file so you can use them in building structures, such as door01, but, not, let's say, Exhaust.
So, let's build a block building. If you created
Open the Bonneville.cfg file (Orbiter\Config\Earth\Base\) in your favorite text editor such as Notepad or Notepad+. Place your cursor at the end of the line BEGIN_OBJECTLIST and press Enter. That provides a line to type in an object.
BLOCK
POS 0 0 -50
SCALE 1 1 1
ROT 330
TEX1 0 0 0
TEX2 0 0 0
TEX3 0 0 0
END
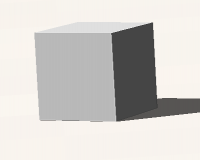
Save the file, you can keep the file open as we will be editing this block. Exit the scenario, then re-launch it. Now, you will see a small cube sitting on the ground about 100 meters in front of you. In the scenario editor, change the time to about 18:00 hours, that puts the Sun behind you so you can see what effect shadows have.
Now note the block is white on the side facing you. If you moved your ship so you could see one of the sides, you will note that it is gray. Orbiter applies shading for shadows.
The block should look something like this:
This block is a cube 1 meter cubed. Now, let's edit the block in Bonneville.cfg as follows:
BLOCK
POS 0 0 -50
SCALE 1 1 1
ROT 330
TEX1 Fcd01 1 1
TEX2 Fcd03 1 1
TEX3 Roof01 1 1
END
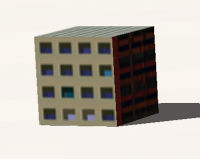
Again, save the scenario, exit to the Launchpad and re-launch. Now, your block should look like something like this.
Components of a block
When building a block, the first line must be BLOCK.
The next line describes the position of the block in relation to the center of the base. If you type POS 0 0 0, the center of the block will sit right on the center of the base.
For the position parameter, POS must be the first part of the line.
The first number X is the distance north or south of center of the base (north is -, south us +) in meters.
The second number Y is the elevation above the terrain or base plane the bottom of the block sits, above is +, below is -.
The third number Z is the position in meters east +, or west - of the center of the base.
The next line starts with SCALE. This indicates the size of the block in the X, Y, and Z axis. So, if you type in SCALE 1 2 3, that makes the block 1 meter wide, 2 meters tall, and 3 meters front to back.

