Difference between revisions of "Creating a simple base"
(Corrected content.) |
(Corrected link) |
||
| Line 50: | Line 50: | ||
Valid objects are: | Valid objects are: | ||
| − | *[[BLOCK]] - an object with four sides and a flat roof used for buildings with a flat roof such as offices, stores, etc. | + | *[[Block|BLOCK]] - an object with four sides and a flat roof used for buildings with a flat roof such as offices, stores, etc. |
*[[HANGAR]] - a building with a barrel-shaped or curved roof and four sides. | *[[HANGAR]] - a building with a barrel-shaped or curved roof and four sides. | ||
*[[HANGAR2]] - a building with a peaked roof and four sides like a house. | *[[HANGAR2]] - a building with a peaked roof and four sides like a house. | ||
Revision as of 12:52, 26 November 2023
A base is used in Orbiter to describe a spaceport to be located on a planet, minor planet, or moon by creating a base configuration file, which is used to describe the name, location, and other need information to describe the base.
Base config file
The configuration file to describe a base is located in the directory Orbiter\Config\<planet>\Base, for example, when Orbiter launches, it will use Orbiter\Config\Earth\Base\Canaveral.cfg to build the Cape Canaveral spaceport, and will contain certain information to build that base. Information contained in a base configuration file include the name of the base, its location, size, whether the objects described by the file conform to the texture of the planet's surface, any navigation beacons, and a list of objects in the base such as runways, pads, buildings, etc.
So let's build a base and see what it looks like as we build it. For this, select a location for the base. For this, I selected a location on the Bonneville Salt Flats figuring it should be pretty flat to build stuff. Looking up the coordinates of the Flat in Wikipedia, sent a ship there and found what looks like water covering much of the area, so I moved the ship a bit until I found dry land that looked reasonably flat for my base.
One way to visually select a location for your base is to launch Orbiter into any scenario. Once launched, unpause if necessary, press CtrlF1 which opens the Orbiter: Camera dialog box. In the Target tab, select the + in front of the Sun, then select Earth or whichever planet you choose. Then select the Ground tab. You will now see a distant image of the Earth, use the mouse wheel to zoom in as necessary, and right-click and move the mouse to navigate to a location, zooming in more as necessary.
When you find a suitable location and move it to the center of the window, select the Current button in the Ground tab, this will update the Position section data. Keep reading here and when you are to type in the longitude and latitude in your base .cfg file, type in or copy and paste the data in that window.
So, let's open Notepad or your favorite text editor. On the first line type in BASE-V2.0. This identifies the file to Orbiter that it is a base. Save the file in the directory Orbiter\Config\Earth\Base\ with the filename Bonneville.cfg. Now, Orbiter will build the base. All base configuration files must contain that as the first line.
The next line, name the base, in this case Name = Bonneville. It does not need to be the same name as the filename, for example, in the Canaveral.cfg file, the Name = Cape Canaveral. This way you can use a simple filename for a base with a more complex name.
The next line contains the location, so type in Location = <longitude> <latitude>, in the case of Bonneville, Location = -80.65165 +28.58438. The + for positive coordinates is likely not required, but, it may be best to include it to make it less confusing to the reader. This will be the center of the base, and where the yellow square appears when flying nearby the base.
The next line is the size of the base. Size = 1000 for example. This defines the radius of the base in meters. It seems to be arbitrary as there are objects listed in some bases that came with the stock Orbiter 2016 with buildings and other objects that are located inside and outside of this radius.
The next line is OBJECTSIZE = 100 which defines the size, in meters, of a typical object on the base. This allows Orbiter to determine the distance that base objects will be rendered on the screen during runtime. Default is 100, objects whose rendered size is less than one pixel will not be rendered until it's visual size exceeds one pixel.
The next line contains MAPOBJECTSTOSPHERE = TRUE or MAPOBJECTSTOSPHERE = FALSE. If this parameter is TRUE, the objects listed for this base will be mapped to the surface of the planet, if it is FALSE, objects will be placed on a flat plane from the elevation of the center of the base.
The remainder of the file contains the NAV list, objects such as runways, pads, buildings, etc. and Surface tile list.
So, here, save your file and launch Orbiter with any scenario. In any scenario, Orbiter will read this file along with all the others and build the base in accordance with your information for this base. If you fly nearby, you should see a yellow marker with the name of the base. Each time you edit the file, you need to exit Orbiter back to the launch pad and relaunch the scenario to see any changes. You can exit, make changes saving them, then relaunch. Or you can edit while the scenario is running, save, exit, and re-launch since Orbiter reads the file only during startup.
Navbeacons are navigation beacons located in various locations about the planet, particularly Earth, which are addressable by your receiver stack, and used by various MFD modes for navigation purposes. VOR transmitters not associated with bases are listed in the planet's config file, e.g. Earth.cfg.
VOR transmitters associated with bases are listed in each base's config file. So, lets add one for Bonneville. In the file Bonneville.cfg, type in the lines BEGIN_NAVBEACON and END_NAVBEACON with a space between them. In that space, type in VOR KBSF -114.05 4061 112.7 500.
Since VOR is the only beacon format used by Orbiter, VOR must be the first part of the line.
The next parameter is the name of the VOR. KBSF was chosen as a moniker for 'Bonneville Salt Flats' so it is unique, it's not used in Earth.cfg VOR list and not used in any base configuration files.
The next parameter is the longitude location of the transmitter in decimal degrees, east is positive (+), west is negative (-). KBSF is -114.05.
Next is the latitude location of the transmitter in decimal degrees, north is positive (+), south is negative (-). KBSF is +40.61.
The next parameter is the frequency of the VOR transmitter in MHz, valid frequencies are 85 to 140 MHz. KBSF is 112.7. It is advisable to check other base config files and the VOR list in the planet's config file to make sure there are not other transmitters using the same frequency that may overlap in any location. The ship's receiver receiving two transmitters' signal at the same time may confuse the receiver and direct you to the incorrect transmitter.
The last parameter is the distance in kilometers from the transmitter which the ship's receiver can detect a signal, default is 500. KBSF is 500.
Then the last line should be END_NAVBEACON which you typed in earlier.
Object List
The next section is the object list which builds objects such as buildings, landing pads, runways, and so forth. So, for the next section type in BEGIN_OBJECTLIST and END_OBJECTLIST on two separate lines with a space between. All objects will be entered between these two lines. There are separate articles for each of the objects listed below.
Valid objects are:
- BLOCK - an object with four sides and a flat roof used for buildings with a flat roof such as offices, stores, etc.
- HANGAR - a building with a barrel-shaped or curved roof and four sides.
- HANGAR2 - a building with a peaked roof and four sides like a house.
- HANGAR3 - a building with a barrel-shaped or curved roof reaching to the ground and only two sides at the ends.
- TANK - an object that is circular with a flat top, used for, obviously, tanks, and other stuff.
- RUNWAY - used for a runway. Obviously a runway can only be used on planets with a substantial atmosphere.
- RUNWAY LIGHTS - used to create lights for a runway. includes the PAPI and VASI.
- BEACONARRAY - an array of lights in a straight line. Used for night lighting for a taxiway.
- SOLARPLANT - a grid of solar panels mounted on the ground. The panels can align themselves with the Sun for best efficiency.
- TRAIN1 - a train configured as a monorail on a straight track.
- TRAIN2 - a train configured as a suspension train on a straight track. Note that TRAIN1 and TRAIN2 worked in Orbiter versions up until O2010, but no longer work in O2016.
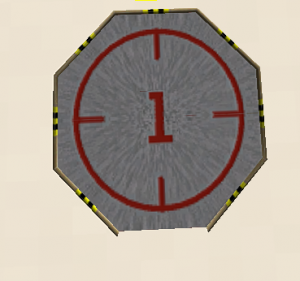
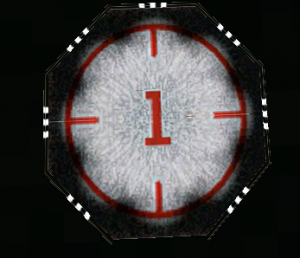
- LPAD1 - an octagonal landing pad.
- LPAD2 - a square landing pad.
- LPAD2a - another square landing pad with a different layout for the texture map.
- MESH - a generic mesh used for custom objects, must be in Orbiter mesh file formats.
Each object is defined by several parameters which describes characteristics of that object, including some that have a default value unless you specify values within the object. The object's texture, or what it looks like will be described by one or more lines. For a texture to be used, there must be a file with the extension .dds in the Orbiter\Textures directory and it must be listed in the file Orbiter\Config\Base.cfg file. Note that if you browse the Textures directory you may find texture files that can be used as object textures but not listed in the Base.cfg file.
If you want to see that the texture looks like, you would need a texture viewer. Any textures you would like to use in objects, such as Cape17.dds, just open Base.cfg and type in the filename without the extension into the list in any order and save it.
To get us started, let's build a landing pad.
Landing Pad
So, in the Bonneville.cfg file, between the BEGIN_OBJECTLIST and END_OBJECTLIST lines type in the following.
LPAD1
POS 0 0 0
SCALE 0.75
ROT 0
TEX Lpad01
NAV 128.00
END
Save your work, and launch a scenario, any scenario. Orbiter reads the file during launch, but, no time else during the session. So, your updated .cfg file will appear in any scenario if your ship is nearby. Your new landing pad should look like the images on the right:
Config file
So, your Bonneville.cfg file should look something like this:
BASE-V2.0
Name = Bonneville
Location = -114.05 40.61
Size = 2000
OBJECTSIZE = 100
MAPOBJECTSTOSPHERE = TRUE
BEGIN_NAVBEACON
VOR KBSF -114.05 40.61 112.7 500
END_NAVBEACON
BEGIN_OBSERVER
Bonneville:Bonneville0:-114.05 40.61 25
END_OBSERVER
BEGIN_OBJECTLIST
LPAD1
POS 0 0 0
SCALE 0.75
ROT 0
TEX Lpad01
NAV 128.00
END
END_OBJECTLIST
Save it, launch any scenario and take a look-see. You now have a base with a landing pad. You may need to move a ship to the LPad.
See separate articles to build other base objects.

