GPIS 4: Fly Me To The Moon
| Chapter 3: Hovering At The Beach | GPIS Contents | Chapter 5: Dancing In The Dark |
Acknowledgement
This material was originally contributed by Bruce Irving from the 2nd edition of Go Play In Space (this chapter was written by Andy McSorley). Refer to the page's View History tab to see subsequent changes.
IMPORTANT NOTE: This chapter is under revision from the 2006 version of Orbiter (Go Play In Space, 2nd edition). Although the "DG to the moon" scenario in Orbiter 2010 is similar to the "Lunar transfer" scenario in Orbiter 2006, dates and many details are different, so this chapter will not properly track with the 2010 version's recorded tutorial flight playback until revisions are complete.
Fly Me To The Moon
This chapter will teach you to fly to another world. The Moon is the closest body other than Earth that you can actually orbit and land on, and it’s really not all that hard to get to in Orbiter, especially with the powerful and fuel-efficient Delta Glider. But we will introduce a few challenges along the way, such as launching to low Earth orbit (LEO) from a runway, flying to an orbit that is well aligned with the Moon’s orbital plane (most or all of the alignment will be done by waiting for a “launch window” that has pretty good alignment to begin with), using the Transfer MFD to determine how to “eject” from LEO at the right time to intercept the Moon, and making mid-course corrections to enter briefly into lunar orbit and get set up for a landing on pad-02 at Brighton Beach. There’s a summary checklist at the end.
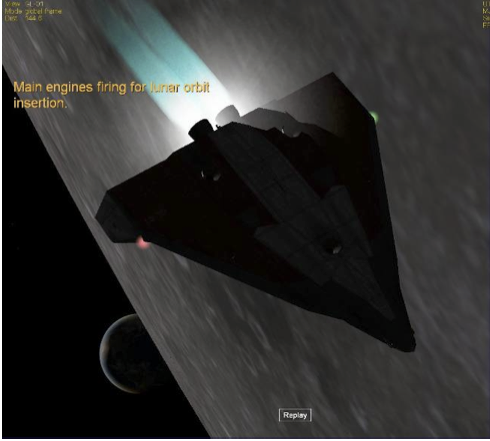
This chapter will make use of your previous experience with changing orbits and controlling your attitude with thrusters, and you will learn some important new skills as well. With this experience, you will be ready to try some interplanetary flights, using either the Transfer MFD or one of the other flight planning MFDs that are available (TransX is supplied with Orbiter, and the newer Interplanetary MFD is available as an add-on – see chapters 6 & 8). You will still have some important skills to master before you can consider yourself a full-fledged “Orbinaut,” including rendezvous and docking with a space station (see chapter 5), atmospheric (Earth or Mars)reentry, and a few others. In chapter 7, we will refer you to some good tutorials by others to help you complete your Orbiter education.
Launch Window Waiting
Welcome back to Earth and to your fast-track Delta Glider training – third lesson and you’re flying to the Moon! Not bad. Time for some more action. So the very first thing you’ll have to do is... wait a while. For the launch window, that is. A launch window is the date and time (or range of dates and time) during which a particular flight is feasible or favorable in terms of the position of the target, length of time required, the required and available fuel, and sometimes other factors, such as the desire for daylight at the starting point or destination. With the DG, you actually have a lot of available energy or delta-V (see chapter 9, “I Was Just Wondering...” for a discussion of delta-V), so you could really ignore some of these things – launch pretty much when you like and use extra fuel to make up for it. But this time you will fly a simple and reasonably fuel-efficient trip to low Earth orbit and then on to the Moon (though the fourdayflightwon’tbeespeciallyfast). TheTransferMFDwillonlyworkifyouandthetargetsharethe same orbital plane. That’s what you’ll have to take care of first, making sure your orbit is aligned with the Moon’s orbit.
Want to Skip the Details for Now? If you’d rather just get set up and flying and learn the details of the alignment issues later, skip for now to where it says “OK, time to fly” and follow those directions.
Orbital Alignment – The big issue for the launch window is orbital alignment, and you will be looking at it with the Align MFD. If the orbital inclination of the target (the Moon in this case) and the inclination of your brief LEO “parking orbit” are very different, you will have to use a lot of fuel to get aligned for the transfer orbit. You could do that in the DG, but ships like the Space Shuttle don’t have this option when they launch (say) for the ISS – they have to launch to an orbit that is well aligned with the orbit of the target, or they won’t have enough delta-V to rendezvous and dock with it (of course the Shuttle has nowhere near the delta-V needed to go to the Moon – it’s purely a LEO machine).
| Inclination, Ecliptic, Equator, Reference, Huh?
Inclination is the tilt of the orbit, normally measured relative to the equator of the Earth. We haven’t worried about it too much, but you can reference orbital information shown in the Orbit MFD (such as inclination, Inc) to different bodies ([REF] button, e.g., Sun, Earth, Moon), from different reference planes ([FRM] button, with options ECL, ecliptic plane, which is the plane of the Earth’s orbit around the Sun; or EQU, the plane of the Earth’s equator). The orbit diagram can also be projected in different planes ([PRJ] button). Projection choices are the ecliptic plane [Prj ECL], which is the plane of the Earth’s orbit around the Sun; the plane of the Earth’s equator [Prj EQU]; and your own ship’s orbital plane [Prj SHP]). Often this is just a matter of convenience, but if you are transferring from one body to another, it becomes more important, and it’s easier to compare two quantities if they are measured in the same way (with some math or the Orbit MFD, it’s easy to switch these references). |
You will start out sitting on the ground, on runway 33 (heading 330° or northwest), but remember the Earth is rotating, and you move along with it. So if you were to look at the Orbit MFD, you would see you already have orbital elements, including orbital inclination! If you measure that orbital inclination relative to the ecliptic (the plane of the Earth’s orbit around the Sun), and you also define your target orbit as the Moon, you will be able to see what the relative inclination would be if you were to launch now. It won’t be very close right now, but you can fix that by just waiting a while.
The Power of Sitting and Waiting – Earth’s Moon is unusual in the Solar System in that its orbit is nearly aligned with its planet’s orbital plane around the Sun (the ecliptic) rather than with the plane of the equator. Furthermore, the Earth’s rotational axis is tilted relative to the ecliptic by about 23.5° (this causes the seasons, among other things), and it rotates every 24 hours. The result of all this is that the Moon’s orbital inclination with respect to the equator varies between 28.60° and 18.30° depending on the time of year, time of month, and time of day (for more on the Moon, see http://en.wikipedia.org/wiki/Moon). If you can launch and get a small relative inclination for your orbit (which you can within a range of about 0° to 10° – note that 28.5° is the minimum equatorial inclination available to launches from KSC’s latitude), you will need only a small plane alignment burn (or possibly none) before transfer.
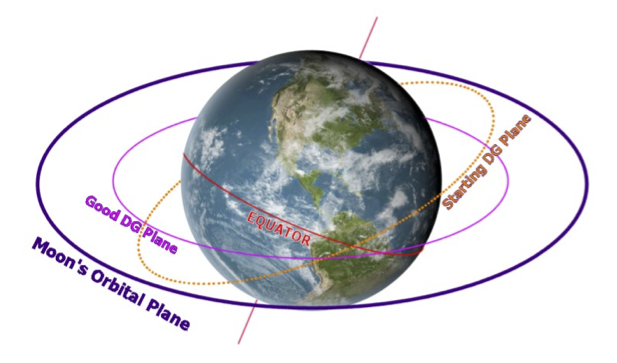
Another way to look at this is to measure both orbits from the ecliptic (ECL) instead of the equator (EQU). The Align MFD does this, and you can set the Orbit MFD to do it too with the [FRM] button.
OK, time to fly. The instructions and MFD information should make things a bit more clear.
| Learning from Orbiter’s Author
This chapter is based on a flight recording of an Earth to Moon flight by Orbiter’s author, Dr. Martin Schweiger. The scenario and its flight recorder files are included in the Orbiter installation, and Dr. Schweiger has added on-screen text notes to the playback file to explain what is going on. So even before you read this chapter, you may want to “watch the movie” to have an idea of how it will all work. You can use the CTRL-P dialog to either play back with the time acceleration that was recorded (about one hour total), or turn this off and use T and R keys to speed up or slow down the playback as desired. You can also use the dialog to interrupt the playback and take control of the rest of the flight from any desired point, following these instructions (note that you can’t resume playback once you interrupt it). |
- Start Orbiter, and open the scenario folder called Tutorials. From this folder, launch the scenario called DG to the moon.
- You will start out in REPLAY mode in the cockpit of your Delta Glider sitting on runway 33 at Kennedy Space Center (KSC). Note the date and time (UT) in the upper right corner of the screen.
- It’s about 01:15 UT on Monday, February 6, 2006 (about 8:15 pm Sunday in Florida). The playback starts out in the no-panel view for best visibility. Most buttons you need are available in this view, so it will be used for all screen shots in this chapter.
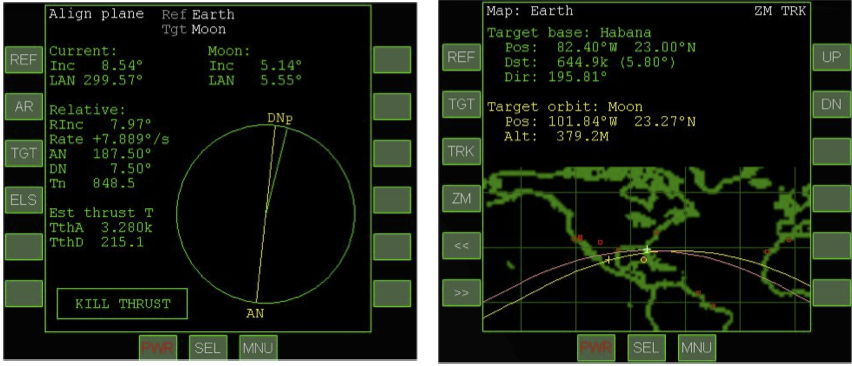
- Notice the Map MFD on the right side (below right).
- It is already set up with the Moon as the target orbit. The yellow line updates to show the Moon’s ground track. Notice that it is not yet lined up very well with the current “orbital” track (you’re sitting on the ground, revolving with the Earth).
- Notice the Align MFD on the left side (above left).
- This MFD is new for you – it is designed to help align your orbit with a target orbit (already set to the Moon). “Align” means to make the inclinations the same, or relative inclination (Rinc) close to zero. Right now it’s about 8° which is why you must wait a bit before takeoff. In about one hour it will get down to around 0.3° and you can launch.
- Watch and read the screen notes, or accelerate time with the T key until just before 02:19 UT on February 6.
- If you are reading the screen notes, you might as well use the scenario’s own playback speed (it will eventually accelerate you to takeoff time). If you are manually controlling the time, you can use 10-1000x, but be careful not to overshoot. Watch the orbital tracks get closer on the Map MFD and the RInc value approach zero on the Align MFD as you approach the optimum launch time, just about 02:20 UT on February 6.
Cleared for Takeoff
OK, it’s your first runway takeoff, it’s night, and you’re going to the Moon. But no pressure. Just take it easy and don’t try to make the turn to heading too fast or too steep – it’s easy to over-bank and end up heading west instead of east (you start out on the runway heading 330° and need to turn right to 90° as you climb out). Note: If you have a joystick, you can use it, but don’t “yank and bank” too hard – keep the turns gentle.
| Takeoff and Climb Goals
There are several things you need to achieve with a runway takeoff and climb to Earth orbit in a space plane like the Delta Glider. You need to get airborne and turn quickly to the target heading, which is due east (90°) in the case, since this direction gives you the most help you can get from the Earth’s rotation speed. You need to quickly gain altitude to get above the dense, drag-inducing lower atmosphere as soon as possible, though with a winged craft, the lower atmosphere also provides lift that helps us gain altitude (unlike a vertically launched rocket for which the engines must provide all the lifting force). And you need to gain a lot of horizontal speed to achieve orbit at the desired altitude. This is mainly controlled with the pitch of the spacecraft, which affects how much lift you get from the wings, and also affects how much engine thrust is directed downward and how much is horizontal. Elevators on the wings control pitch at first, but above 30-40 km, you may need the RCS thrusters (though in the recorded flight, the RCS thrusters were not needed until orbit was achieved). |
You will use the Surface HUD for most of the information you need on the ascent. Note that if you take over and fly the ascent manually, whether you use the keypad or joystick, the DG can be a bit tricky to fly in the atmosphere – so it may take a few tries to get right. The replay makes it look easy, but the person flying it has had lots of practice! With the exception of instructions to change and adjust settings on the MFDs, most of the following instructions will apply only if you take control. The recording incorporates all the actual flight operations.
- Apply full main engine thrust.
- Press the KEYPAD-+ key, then the CTRL key to lock at full thrust, or drag the main engine throttles to the top on the panel (if displayed). You should not have to steer.
- Watch the HUD for V100.0 which is rotation speed (time to raise the nose for liftoff).
- No-panel helps forward visibility, but there really isn’t that much to see until you reach orbit, so you can display the panel if you prefer (F8 key). Rotation speed needn’t be exactly 100 (90-110 m/s is OK).
- Apply gentle back stick or press and hold KEYPAD-2 to raise the nose and fly off the runway (pitch up to about 30°).
- Watch the HUD for pitch, roll, altitude, and speed. Some people like to apply some nose-up trim for the climb, though the recording does not use trim. The trim control is on the right panel below the autopilot buttons (you can also use the Del key for nose up, and the Ins key for nose down trim). While optional, elevator trim provides most of the aerodynamic “back stick pressure” (or KEYPAD-2 key) needed to keep the nose up for the early part of the climb, so it’s quite useful.
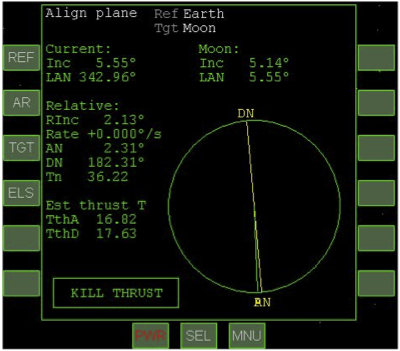
- Raise the gear (G) and start a gentle (~30°) roll (bank) to the right.
- Use the KEYPAD-6 key (or right stick). Maintain slight stick back pressure or KEYPAD-2 taps to keep the pitch at around 30° while you make the turn to 90° heading. You can increase back pressure somewhat to speed up the turn. When you reach a heading of about 75° you should start to reduce your bank (KEYPAD-4 or left stick) to avoid overshooting the required 90° heading. This can be tricky especially with the keypad, so it may take you several tries to get everything right.
- At 90° heading, set the pitch to about 30° and continue climbing.
- Recall that the direction indicator (the -^- symbol) shows where the nose is pointing, and its position on the pitch ladder shows your pitch angle. The position of the velocity vector (VV, the ⊕ symbol) on the pitch ladder shows the direction you are actually moving, which is usually not exactly where you are pointing. Keeping VV above the zero pitch line will keep a positive rate of climb.
- Make small bank adjustments (KEYPAD-6/4 keys) as needed to hold approximately 90° heading. You will see that your heading affects the RInc value shown in the Align MFD, which you want to make as close to zero as possible. So you can make small adjustments to minimize this value instead of holding exactly 90° (in the recording, the heading ends up closer to 100°).
- At 30-40 km, you may want to activate the rotational RCS thrusters with CTRL-/ (if you are flying manually).
- The recording does not do this, and the VV starts to drift downward even with constant back pressure, meaning that the climb angle is reduced. This is because the air density has dropped. You can also activate this with ROT button (upper left in no-panel view) or with the RCS rotary switch on the upper right panel (if displayed).
- Above 40 km, allow pitch to fall to about 20° to start to build horizontal velocity, but keep varying pitch slightly as needed to keep climbing.
- You will continue to climb but with a smaller vertical speed which is OK. Once you are above the dense part of the atmosphere, drag is lower, and you can accelerate more efficiently to gain orbital speed. Keep your VV above the 0° pitch – you will typically have to adjust the pitch up and down slightly as you climb to do so.
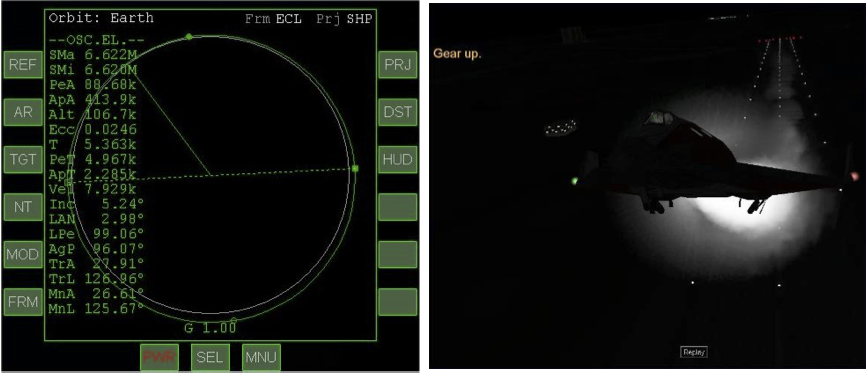
- On the left MFD, click [SEL] and then [Orbit], then set projection to “ship” with the [PRJ] button, and set altitude mode with the [DST] button.
- This displays the Orbit MFD so you can see how your orbit is developing. It's still mostly below the surface now (ballistic trajectory) but it will rise quickly once you reach orbital speed. As you get close to this orbital speed, the orbital values will change fast.
- Keep burning until HUD velocity is around 7500 m/s and ApA is above 300 km, then kill main thrust with KEYPAD-* (or drag throttles to zero).
- For a stable orbit, PeA should be above 200 km, and ApA is not especially critical, but the recorded flight has a PeA below 90 km and you may as well. This is OK for the short time you will be in this parking orbit. Note also that the Surface HUD shows ground speed (about 7500 m/s) while the Orbit MFD Vel value is orbital speed (about 7900 m/s, below left). Both speeds are correct, but they are measured differently. The Surface MFD has buttons to show four different speeds (IAS, TAS, GS, OS). The first two are only valid in the atmosphere (indicated and true airspeed), GS is ground speed, and OS is orbital speed.
- Switch HUD to orbital mode by clicking the [HUD] button on the Orbit MFD.
- Orbital mode shows your attitude relative to your orbital plane rather than relative to the surface. The [HUD] button transfers any settings (such as reference planet) from the MFD to the HUD.
Tweak and Align the Orbit
Now that you’ve reached orbit, you can see what adjustments (if any) are needed. As mentioned above, the exact orbit shape isn’t too important since you will be leaving shortly for the Moon anyway, but if you have hand-flown to orbit, some adjustment may still be needed. The recorded flight was quite accurate in terms of relative inclination (RInc about 0.2°), but if you end up with more than 0.5° RInc, you will need to do a plane change to reduce this in order for the Transfer MFD to work well. The Transfer MFD assumes that the target orbit is in the same plane as you are, or at least very close. If you are following the recorded flight, note that the steps in this section will not be needed now, but the concept of a plane change is still important, and the recorded flight will perform a plane change near the Moon in order to align the orbital plane with the target base for landing.
Alignment Issues – Recall that when you needed to change the size of the orbit (periapsis or apoapsis), there was a special point in the orbit to do this (which is at the “opposite end” of the orbit, e.g., burn at apoapsis to change periapsis, retrograde to lower it, prograde to raise it). A similar thing applies to orbital inclination – you burn in a special place and in a special direction to change the “tilt” of the orbit. Remember the square symbols on the Orbit MFD? Those are called nodes, and they show where one orbit crosses a target orbit (or a target plane, typically the equatorial plane if there is no target orbit).
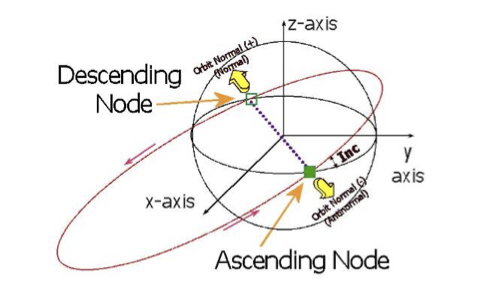
To change the orbital inclination, you point the ship in a special direction and burn. The directions (yellow arrows, figure above) are called orbit normal (or normal +) and orbit anti-normal (or normal - ). To reduce your relative inclination (RInc) with the target orbit, the mnemonic (memory hint) is “AN for AN,” meaning “Turn Anti-Normal at Ascending Node.” The descending node is opposite (turn Orbit Normal). The Align MFD gives you a lot of help with this – it actually tells you which direction to turn, how long until you start the burn (Tn), and how long to apply thrust (Tth). The message actually flashes when you need to fire main engines at full thrust! The following screens are NOT from the recorded flight, but from a hand-fly to orbit that left a 2° alignment difference, too large for a good transfer.
- Restore the Align MFD to one of the displays with target Moon if you have closed it (click [SEL] then [Align Planes]).
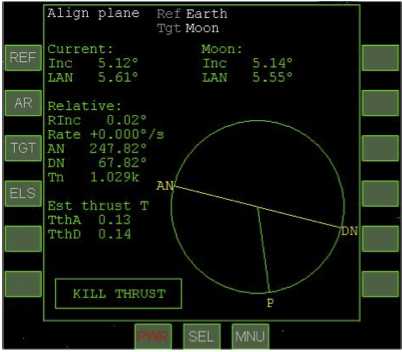
- You will still want the Orbit MFD on one display (no target for now, [NT] button). Depending on how it was flown, you may be approaching either descending or ascending node. Just after achieving orbit in the recorded flight (Sim 4543s), the Time to Node (Tn) was 78 s and the Descending Node Thrust Time (TthD) on the Align MFD was 2 s. With RInc of 0.24°, this small burn wasn’t needed in the recorded flight, but in the above screens, alignment was off by 2.1°, with ascending node coming up next. The left screen shot is somewhat after orbit insertion, already very close to the AN. The right screen shot is after the 16.82 s anti-normal burn (0.02° RInc is very good).
- For AN Case: Click the Orbit Antinormal (-) autopilot button ( NML - at bottom of no-panel or ' key) and watch for Tn to reach around 60 s.
- This will position you correctly for the burn at the ascending node (AN). You can carefully time accelerate with T until Tn is about 60 s, then slow to 1x with R. The flashing message on the Align MFD will tell you to start the burn when Tn is half of TthA, so when Tn is just over half of TthA, you may slow to 0.1x to start the burn more precisely (the burn is likely to be short, so you may choose to stay in 0.1x).
- When Tn reaches half of TthA (time to thrust), apply full main thrust (throttles or KEYPAD-+ key).
- It is more accurate to apply half of the burn time before reaching DN and half after passing it. The “engage thrust” message will flash.
- When RInc reaches ~0° and TthA reaches zero, kill the main engines.
- You may again find it useful to briefly use 0.1x time for more precise cutoff timing. If the RInc is still off a little, try using linear RCS thrusters (forward and back, KEYPAD-6 and 9) to tweak it. If it’s too far off (more than a degree), wait to reach DN and make a small normal (+) burn – use the NML + button for this case. In this case, you may also have to raise your periapsis with a prograde burn at apoapsis if PeA is less than 200 km so you can safely complete an orbit.
Transfer MFD and Eject Burn
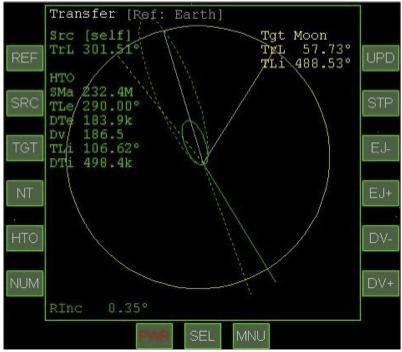
Now that your orbital plane is aligned with the Moon’s orbital plane, you are ready to plan and execute the transfer orbit, using the Transfer MFD. The Transfer MFD displays the spacecraft orbit (green, too small to see clearly if the target is the Moon’s much larger orbit) and target orbit (yellow), something like the Orbit MFD, but with some special features (see the Orbiter PDF manual section 13.10 for more details on the Transfer MFD). Note that if you are following the recorded flight, you can still enter a transfer solution in the Transfer MFD for practice, but the solution will not affect the playback. If you are hand flying the scenario, you will use the Transfer MFD to time your TLI (trans-lunar injection) burn.
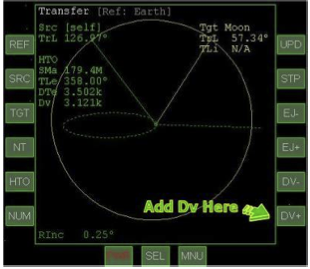
The key feature is the “hypothetical transfer orbit” ([HTO] button) that simulates the approximate transfer orbit as a dotted ellipse that you can change in size (with [DV+] or [DV], for delta-V) and/or direction (with [EJ+] or [EJ-] for eject location). This is the key to transfer orbit planning, the ability to estimate the effect of a certain burn (DV) and certain eject direction (EJ) before you make the burn. It’s not exact, but it’s a pretty good estimate, and you can always make a mid-course correction if needed when you get fairly close to the Moon. Note that if you hand-fly, your starting orbit will be at least slightly different so your pictures and numbers will not exactly match the ones shown here.
The Transfer Idea –The idea of the Transfer MFD comes from the need to “lead” a moving target. If you want to throw a ball to someone who is running, you need to throw it to where the runner will be when the ball gets there, estimating how far they will move, and controlling the direction and speed of the thrown ball to make it get there at the right time. In the case of the Moon, the “target” moves in a predictable path (orbit), and if you could try out different energy amounts (delta-V) to get the right distance (size of the transfer orbit), and different starting locations (EJ) in your own orbit, you could eventually find a combination that reaches the Moon’s orbital distance at the same time and place as the Moon. This is what you do with the “hypothetical transfer orbit” (HTO), “hypothetical” meaning “what if?” What if I apply this much delta-V starting at this orbital position? What would my orbit look like? Would it arrive at the Moon’s orbital distance? Where would the Moon be at this arrival time?
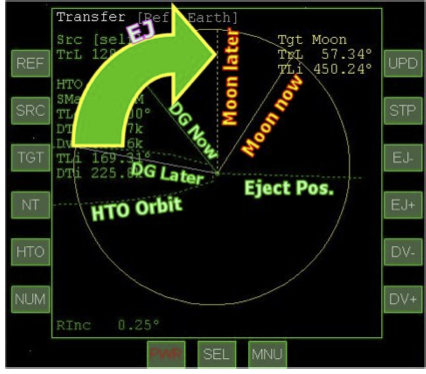
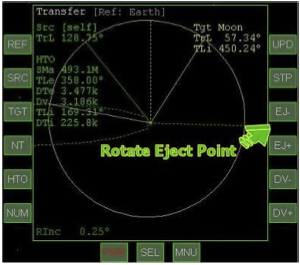
The clever part of the Transfer MFD is that as you tweak the orbit size with delta-V, and vary the “eject” position (time or angular position around your orbit), you can graphically see the changes in the hypothetical orbit. By making a couple of lines coincide (the “LATER” positions of you and the target), you force the MFD to solve the transfer equations for the desired result (the place where you and the Moon arrive at the same time). It’s easier to use than to explain!
Transfer MFD – The MFD has a number of controls, of which you need just a few right now. It’s easiest just to walk through the steps and explain as you go along.
- Select the Transfer MFD on the right side (click [SEL] then [Transfer]).
- Click the target button [TGT], select Enter by Name, type moon, and press the enter key.
- The Moon’s orbit (target) is yellow, and yours is green, but too small to see at this scale.
- Click the [HTO] button to enter hypothetical transfer orbit mode.
- Some new values will appear on the left side of the MFD (HTO block).
- Start to add delta-V by clicking the [DV+] button.
- Note that you are not really adding delta-V yet (that comes later with the burn), you are just entering assumed values to predict the hypothetical effect. You will need to click it quite a few times before it grows enough to see (the delta-V added is displayed as Dv, and you will need over 3000 m/s of delta-V for the transfer). The HTO is shown as a dotted ellipse. When this ellipse reaches or passes the Moon’s orbit, you have an intercept solution, but not at the right place (i.e., you would reach the Moon’s orbital distance, but not when the Moon is there). If you are following the recorded flight, you will use the [DV+] button until Dv reaches 3.186k. This will extend the dotted ellipse well past the Moon’s orbit at first.
- Use [EJ -] and/or [EJ +] to rotate the gray “later position” line to coincide with the yellow dotted line representing the Moon’s later position.
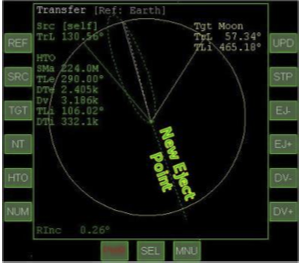
- All the lines will move as you try to get a solution, and sometimes you can get close and then it “jumps.” Try increasing the DV in this case, or clicking [EJ-] and [EJ+] slowly to try to get closer to the solution. You can also get “No intercept” as you rotate the gray line – again, just use [DV+] to enlarge the HTO ellipse a bit until it intercepts again. If you are following the recorded flight, you will use the [EJ+] and [EJ-] buttons until TLe reaches 290°. TLe is the angular position at which the burn will take place. Note that these values place the intersection point of the HTO slightly ahead of the Moon's target position. Passing the Moon on the leading side will allow you to later enter into a retrograde lunar orbit (opposite the Moon’s rotation direction).
Wait for Eject Position – With a good HTO solution, all that’s left is to wait for the eject time (DTe, which is about 2405 s in the above right picture, about 40 minutes). When you get to within a minute or so of that position, you’ll turn prograde and prepare for full thrust on the main engines 30 seconds before DTe reaches zero. A burn providing over 3000 m/s of delta-V will take several minutes, and the Dv value will continuously show the remaining delta-V needed to complete the calculated burn. When it reaches zero, it’s time for main engine cutoff (MECO).
- Wait or accelerate time until DTe (eject time) is about 60 s.
- It’s best to stay at 100x or slower when close to a planet (if you choose to use 1000x, at least turn off any autopilot function first). The recording uses 10x in this phase.
- Use PRO GRD autopilot button or [ key to turn prograde for the eject burn.
- You are adding to your orbital velocity, so prograde is the correct direction.
- When DTe reaches about 30 s, apply full main thrust.
- This will be a little before the ship’s radius vector (solid green line) reaches the ejection point (dotted green line). Use throttles or keypad as you have done before. This will be a long burn (around 3 minutes), but keep an eye on the Dv value. It changes fast especially at the end (picture below right has remaining Dv of 186.5 m/s and the real (green solid ellipse) transfer orbit is starting to approach the dotted HTO orbit.
- When DTe reaches zero, press the [Kill Rot] button (or KEYPAD-5 key).
- This turns off the prograde autopilot to keep it from recalculating and changing the prograde direction to follow the new orbit (the correct direction for the whole burn is the prograde direction at the ejection position, or DTe = 0).
- When remaining Dv drops to ~600, start reducing thrust.
- This is to avoid overshooting the HTO target (dotted) ellipse, since the shape changes fast in the last few hundred m/s of Dv. Drag throttle down or use KEYPAD-- key with the CTRL key to reduce thrust. Bring it down to zero when the ellipse matches the target (or when Dv is close to zero).
- Click the [HTO] button to turn off HTO mode.
- This allows you to see the actual orbit information (not shown).
You are on your way to the Moon! But there are still a few things to look after before you get there.
Cruise and Correct
Now all you have to do is wait for a few days and watch the Moon get closer and closer. While the transfer orbit you’ve planned is a bit faster than the energy-minimum Hohmann transfer, it is still a fairly slow way to go to the Moon – roughly 4 days and 6 hours (for comparison, Apollo 11 took about 76 hours from mission start to lunar orbit insertion, 3 days and 4 hours). Faster transfers take more fuel for the TLI burn and more fuel to slow down when you get there. Fortunately you can use time acceleration in Orbiter, so it’s not too bad. You can safely use up to 100x time acceleration for the first few hours (until maybe 40,000 km from the Earth), then you can use 1000x or so time acceleration until the Moon’s gravity really starts to kick in (see below). You should not use any autopilots with 1000x – if you want to turn retro or prograde or something, you should first set time acceleration to 1x or 10x then turn off the autopilot before going back to 1000x. Be sure to take a good look back at Earth (external views are best). If you are following the recorded flight with time acceleration as recorded, it will speed time up considerably during the cruise portion (up to 2000x once you get some distance from Earth).
This might be a good time to mention that there are other tools available for planning flights away from the Earth (Moon, Mars, or other planets). Many Orbiter users find the Transfer MFD to be all they need for Moon flights, and even for Mars journeys and beyond (there are some “tricks” for interplanetary flights, see the Orbiter manual section 13.10). TransX is an add-on MFD developed by Duncan Sharpe that is now supplied with Orbiter (it has its own PDF manual in the /Doc folder). Interplanetary MFD is a newer add-on available on the web (see chapter 6 for an Earth-Mars flight using IMFD).
The plan now is to fly directly to Brighton Beach, entering lunar orbit only briefly in the process. To enter an orbit with the proper inclination and periapsis to pass low over Brighton Beach, several burns will be needed, all fairly close to the Moon: (1) a plane change burn to change the orbital inclination to pass over the base, (2) a retrograde lunar capture burn to slow down, lower the periapsis, and enter an eccentric but closed temporary orbit, and (3) another retrograde burn, this time at periapsis, to lower the height of the orbit on the opposite side of the Moon (above the base) to under 10 km.
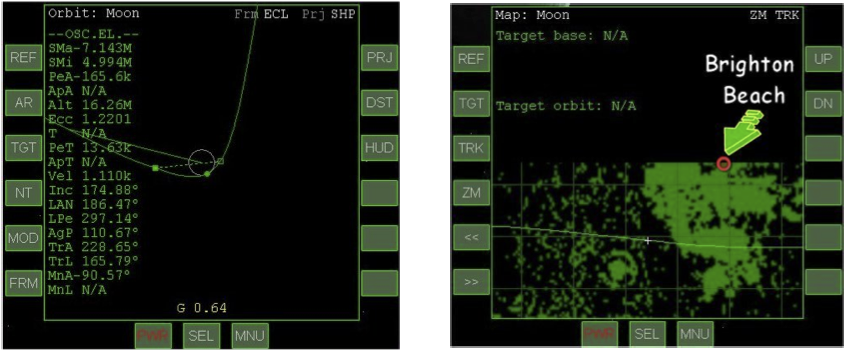
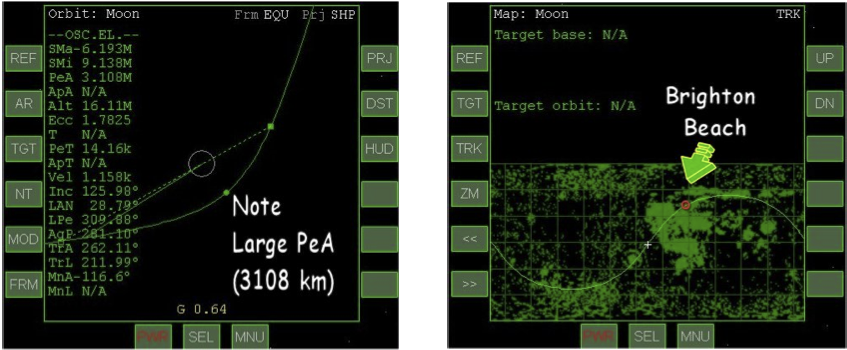
Plane Change Burn – To get the needed plane change with minimum fuel use, it’s best to perform this burn fairly far from the Moon, but at a point where the Moon’s gravity dominates (within the Moon’s sphere of influence or SOI). You can tell this from the G indicator at the bottom of an Orbit MFD with reference set to the Moon. For accurate orbital elements, this should be above 0.5 (it’s 0.64 in the case of the recorded flight). Plane change burns are usually done at one of the nodes (ascending or descending), which changes the inclination but not the periapsis or apoapsis. In this case, the burn will be done in the normal-plus direction but not at a node, as you can see in the Orbit MFD view of the burn position below left. This means that the periapsis will also change, but this will need further adjustment anyway (PeA is negative, i.e., 165.6 km below the Moon’s surface in this case, but this will soon be raised).
As you can see in the zoomed-in Map view (below right), at the time of the correction burn, the orbital plane is approximately in the equatorial plane of the Moon, and Brighton Beach is northeast of the current equatorial position. A Normal(+) burn will make the burn position an ascending node with respect to the Moon's equatorial plane, i.e. will raise the eastern part of the trajectory to higher latitudes, as required.
- On the Orbit MFD, click [AR] (auto reference) to select the strongest gravitational source, which is now the Moon.
- This is shown above left. Then click [HUD] to copy the new reference to the HUD.
- Switch the right MFD to the Map (click [SEL], [Map], then [REF] and choose Earth -> Moon from the list of bodies that pops up.
- The red square is Brighton Beach, your destination (above right). Note that the ground track is near the equator (inclination is 174.88°, about 5° from a retrograde equatorial orbit which would be 180°). The inclination needs to be changed for the ground track to “ascend” to the northeast and pass over Brighton Beach (~41° north latitude). Use [ZM] to toggle the two zoom settings as desired (whole Moon or small area).
- Click the [TGT] button on the Orbit MFD and select Brighton Beach.
- This is to define your target base. Use the arrow keys to choose Spaceports and then Brighton Beach, the only base on the (default) Moon.
- Click the NML + button to orient in the normal-plus direction.
- This is labeled “Orbit Normal +” in the control panel view, or use te semi-colon (;) key. A burn in this direction will make this point an ascending node (with new orbit rising north of the equator as required to reach Brighton Beach to the northeast).
- Start a main engine burn, keeping an eye on the Map MFD.
- Try low thrusts or brief bursts. The orbital track will start to rise to the north – prepare to stop burning when the orbital track approaches Brighton Beach.
- Reduce and cut off main engine thrust.
- Burn time in recorded flight was about 23 s. In the recorded flight, the resulting inclination was about 126°. Adjust with linear or retro thrust if needed. Note that PeA as well as inclination have changed and PeA is too high (over 3000 km).
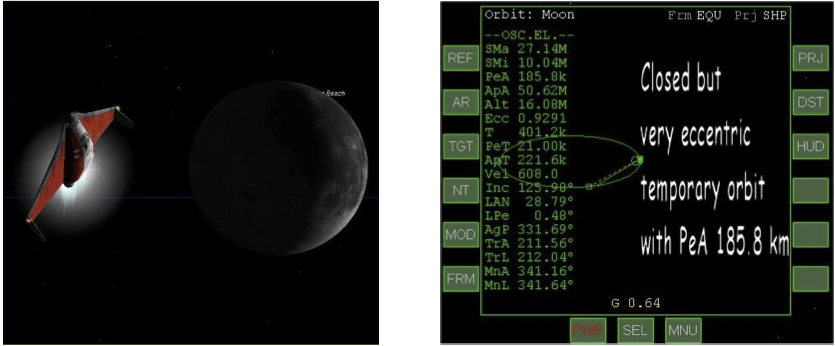
Periapsis Adjustment Burn – Since the plane change did not occur at a node, the burn also changed the periapsis altitude (PeA), though the orbit is still hyperbolic (Ecc > 1, not a closed orbit around the Moon). A retro burn is needed to reduce the PeA and allow capture into an initially eccentric but closed orbit. The position of this retro burn is not critical as long as it results in a closed orbit and PeA around 200 km. This is just an interim orbit and will need to be adjusted further for approach and landing.
- Click the RETR GRD button to orient in the retrograde direction.
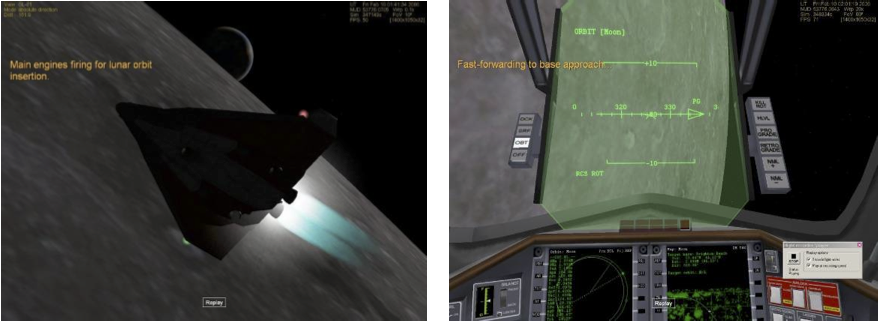
- A retrograde burn will slow you down, allow capture into lunar orbit, and lower the periapsis height in initial preparation for approach and landing.
- Apply full main engine thrust while monitoring PeA.
- When PeA reaches about 200 km, stop the burn. In the recorded flight, this burn was about 30 s and resulted in PeA of about 186 km (ApA > 50,000 km, Ecc 0.93). Moon- relative velocity fell from around 1160 m/s to 610 m/s, a delta-V of about -550 m/s.
- Turn prograde PRO GRD so you can watch the approach to the Moon.
- In the recorded flight, this burn was completed some 20,000 s or over 5.5 hours (PeT 21.00k s above) before periapsis, so there is some time to kill (or time accelerate). Note that in the “upside down” prograde cockpit view, the lunar south pole is “up” so it looks like you are entering “behind” the Moon rather than “ahead” of it as you actually are.
Approach Orbit Insertion Burn – This retrograde burn will be made at the initial periapsis position to lower the orbit on the other side of the Moon, setting a very low new periapsis near the target base in preparation for approach and landing. Watch the PeT (periapsis time) value while you time accelerate to the burn position (the recorded flight uses 200x time acceleration).
- When PeT reaches about 120 s, click the RETR GRD button to orient in the retrograde direction again.
- Make sure you are at 1x time. This retro burn will lower the current, high apoapsis to set a new, much lower periapsis on the opposite side of the Moon, near Brighton Beach.
- When PeT reaches 35 s, apply full main thrust.
- This turns out to be about a 35 s burn in the recorded flight, so be prepared to pull back the thrust pretty quickly since you want a small (under 10 km) but positive PeA.
- Turn prograde again if desired for the forward view.
- You will need to turn retrograde yet again during the approach in order to use main engines for most of the deceleration for approach and landing.
Approach and Landing
You are now in orbit around the Moon, but you won’t complete a full orbit before starting the approach to land at pad 02 at Brighton Beach. The approach to Brighton Beach is much the same as that described in detail in chapter 3, although Dr. Schweiger’s recorded flight does do a few things a bit differently. You can best follow and learn the details by watching the replay and reading and following his comments. Just be sure to set up the MFDs per instructions so it will all make sense (the playback will land you no matter what views or MFDs are displayed, but the comments will only make sense if you have the correct instruments and settings). Here are some key points to note. The times (in seconds) are the Sim counter times from the recorded flight, shown in the upper right screen corner. For reference, the landing time is 350740 s (just over 4 days from simulation start) so the time covered in this section is about 3500 s or just under one hour before landing:
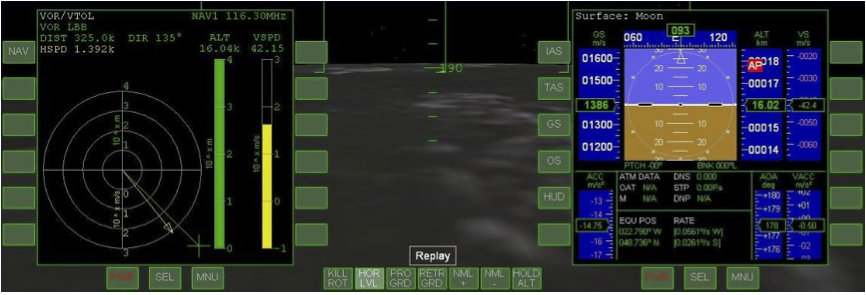
- Fast forward to base approach (Sim 347261 to 349840 s) – Recording uses 20x.
- Use Main Engines – At about 400 km from base (349850 s), turn retrograde RETR GRD again to prepare for deceleration and path adjustment burns (you will approach the base tail first until just under 100 km in order to use main engines for this), and also turn level to the horizon HOR LVL for better control and orientation with the surface. Slow to around 1200 m/s to start.
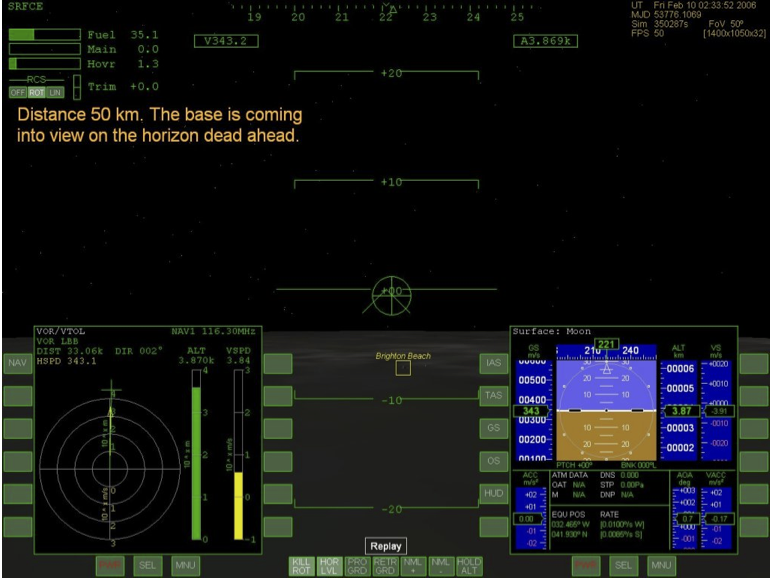
- Set Up MFDs – Switch the left MFD to VOR/VTOL (landing), where the long range VOR beacon for Brighton Base (LBB) has already been set up as NAV1. Also switch the right MFD to Surface and click its [HUD] button to sync the HUD to the surface data. The Surface MFD provides a lot of information, most usefully the vertical speed (VS). You will need this to determine how much hover thrust you will need as your horizontal speed is decreased.
- When to burn? As mentioned in screen notes, main engines provide about 20 m/s2 of acceleration, and if current ground speed is about 1200 m/s, it will take t = v/a = 60 s to kill all ground speed, and the distance would be d = vt – 1⁄2 at2 or about 40 km. You generally will decelerate in stages rather than stopping and dropping straight down to the pad from high altitude, so you will start decelerating before this (as shown in the flight recording).
- Use Retros – Once you have slowed down to under 500 m/s and get within 100 km from the base (DIST value on VOR/VTOL MFD), you can rotate to face the base PRO GRD, and also open your retro engine doors with the panel switch (if visible) or by calling up the DG Controls dialog with Control-Spacebar and clicking the Retro Doors button there. Further slowing will be done with the low-thrust retro engines. Also switch to the Pad-02 ILS beacon (stored as NAV2) by clicking the [NAV] button on the VOR/VTOL MFD.
- Watch Your Speed – As you get closer to the base, continue to monitor and adjust both VS (with hover thrust) and ground speed (GS, with retro thrust), and to adjust your line up with LIN mode thrusters. At 10 km, you should slow to 200 m/s or slower, 100 m/s at 4 km, and under 20 m/s when you are within 1000 m of the base. Keep the VV (velocity vector or flight path marker ⊕ symbol) on or very close to the base.
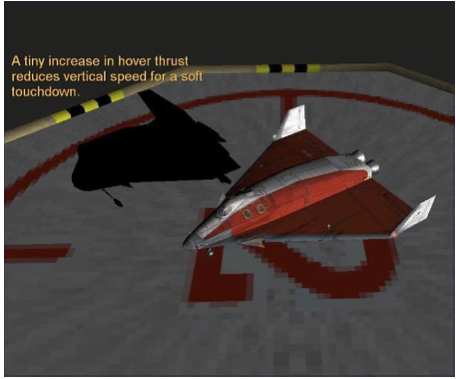
- Line Up and Hover – You will lose sight of the pad before reaching it even with no-panel view, and you must then rely on the VOR/VTOL display to guide you to a landing. Stop over the pad and use hover thrust (and linear thrusters as needed to stay lined up) to establish a slow descent onto the pad. A small burst of hover thrust in the last few meters will soften the landing.
That’s it – you made it back to the Moon!
Summary of Steps (Fly Me to the Moon)
Note: If you have the LandMFD add-on (LazyD’s landing autopilot, LandMFD0514.zip), it may cause a problem with this scenario (when you cross the Moon’s SOI) if it is activated in the Launchpad, even if you are not using its MFD in the current scenario. This problem may be fixed with a later version of LandMFD. We’re not sure of the exact cause – it’s just something that showed up in testing.
Launch Window Waiting
1. Start Orbiter, and open the scenario folder called Tutorials. From this folder, launch the scenario called Lunar Transfer.
2. Notice the Map MFD on the right side (below right). It is already set up with the Moon as the target orbit.
3. Notice the Align MFD on the left side
4. Watch and read the screen notes, or accelerate time with the T key until just before 02:19 UT on February 6.
Cleared for Takeoff
5. Apply full main engine thrust. Press the KEYPAD-+ key, then the CTRL key or use the throttles in panel view.
6. Watch the HUD for V100.0, which is rotation speed (time to raise the nose for liftoff).
7. Apply gentle back stick or press and hold KEYPAD-2 to raise the nose and fly off the runway (pitch up to about 30°).
8. Raise the gear (G) and start a gentle (~30°) roll (bank) to the right.
9. At 90° heading, set the pitch to about 30° and continue climbing. You can actually adjust the heading to try to drive RInc as close to zero as possible (maybe 90°-100°).
10. (Optional but can be helpful) At 30-40 km, you may want to activate the rotational RCS thrusters with KEYPAD-/ (if you are flying manually).
11. Above 40 km, allow pitch to fall to about 20° to start to build horizontal velocity, but keep varying pitch slightly as needed to keep climbing.
12. On the left MFD, click [SEL] and then [Orbit], then set projection to “ship” with the [PRJ] button, and set altitude mode with the [DST] button.
13. Keep burning until HUD velocity is around 7500 m/s and ApA is above 300 km, then kill main thrust with KEYPAD-* (or drag throttles to zero).
14. Switch HUD to orbital mode by clicking the [HUD] button on the Orbit MFD.
Tweak and Align the Orbit
Note: These steps not needed if following recorded flight or if hand-flown and RInc is around 0.4° or smaller
15. Restore the Align MFD to one of the displays with target Moon if you have closed it (click [SEL] then [Align Planes]).
16. For AN (Ascending Node) Case: Click the Orbit Antinormal (-) autopilot button ( NML - at bottom of no-panel or ' key) and watch for Tn to reach around 60 s.
17. When Tn reaches half of TthA (time to thrust), apply full main thrust (throttles or KEYPAD-+ key).
18. When RInc reaches ~0° and TthA reaches zero, kill the main engines.
Transfer MFD and Eject Burn
19. Select the Transfer MFD on the right side (click [SEL] then [Transfer]).
20. Click the target button [TGT], select Enter by Name, type moon, and press the enter key.
21. Click the [HTO] button to enter hypothetical transfer orbit mode.
22. Start to add delta-V by clicking the [DV+] button.
23. Use [EJ-] and/or [EJ+] to rotate the gray “later position” line to coincide with the yellow dotted line representing the Moon’s later position.
24. Wait or accelerate time until DTe (eject time) is about 60 s.
25. Use PRO GRD autopilot button or [ key to turn prograde for the eject burn.
26. When DTe reaches about 30 s, apply full main thrust.
27. When DTe reaches zero, press the [Kill Rot] button (or KEYPAD-5 key).
28. When remaining Dv drops to ~600, start reducing thrust until Dv is close to zero.
29. Click the [HTO] button to turn off HTO mode.
Cruise and Correct
Once you are around 40,000 km or so from Earth and have all autopilots off, you can use up to 1000x time acceleration to speed up the cruise phase to the Moon.
30. Base Alignment Burn – Once the Moon becomes a significant gravity source (G 0.5 or greater at bottom of Moon-referenced Orbit MFD), a plane change burn will be needed to align orbit with Brighton Beach Moon Base.
31. On the Orbit MFD, click [AR] (auto reference) to select the strongest gravitational source, which is now the Moon.
32. Switch the right MFD to the Map (click [SEL], [Map], then [REF] and choose Earth -> Moon from the list of bodies that pops up.
33. Click the [TGT] button on the Orbit MFD and select Brighton Beach.
34. Click the NML+ button to orient in the normal-plus direction.
35. Start a low-thrust main engine burn, keeping an eye on the Map MFD.
36. As the orbital track approaches Brighton Beach, reduce and cut off main engine thrust (fairly short burn, probably under 30 s).
37. Periapsis Adjustment Burn – A retro burn is needed to adjust to a PeA of ~200 km and to create a closed but very elliptical parking orbit.
38. Click the RETR GRD button to orient in the retrograde direction.
39. Apply full main engine thrust while monitoring PeA for a value of about 200 km (short burn, ~30 s).
40. Turn prograde PRO GRD so you can watch the approach to the Moon.
41. Landing Approach Orbit Insertion Burn – At periapsis, another retro burn is needed to lower the high apoapsis to a new very low periapsis (~10 km) on the other side of the Moon near the base.
42. When PeT reaches about 120 s, click the RETR GRD button to orient in the retrograde direction again.
43. When PeT reaches 35 s, apply main thrust (another short burn, ~30-40 s), watching PeA for a value just under 10 km.
44. Turn prograde again if desired for the forward view (although you will need to use the main engines for your main retro burns to slow down for the approach and landing).
Approach and Landing
Approach and landing are not described in detailed steps in this chapter. See the Moon landing instructions in chapter 3, which are very similar to this situation, or watch the playback (with comments) of the landing supplied for this chapter. 
| Chapter 3: Hovering At The Beach | GPIS Contents | Chapter 5: Dancing In The Dark |

