GPIS 3: Hovering At The Beach
| Chapter 2: Smack! Rescue | GPIS Contents | Chapter 4: Fly Me To The Moon |
Acknowledgement
This material was contributed by Bruce Irving from the 3rd edition (unpublished) of Go Play In Space. Refer to the page's View History tab to see subsequent changes.
Hovering at the Beach
You won’t be flying to the Moon just yet, but this exercise will have you flying on the Moon to practice hover takeoffs and landings, near-surface maneuvers and navigation, and a few other things. Why the Moon? With no atmospheric drag to slow things down, and with gravity only one-sixth that of Earth, the Moon is a great place to practice hover flight and low-speed maneuvers. It’s also very easy to achieve orbit on the Moon, but hover-to-orbit is not on the training schedule just yet (OK, I know you’ll do it anyway, but just get through the basic stuff first!).
In this exercise, you will again fly the Delta Glider, using its hover engines, auto-level, and auto-hover features to maintain an altitude of around 20 m. You will then use translation and rotation thrusters to move slowly (no more than 10 m/s) around the base, following instructions on which landing pads to use. You will also make use of radio beacons to help judge distance and direction to the correct pad.
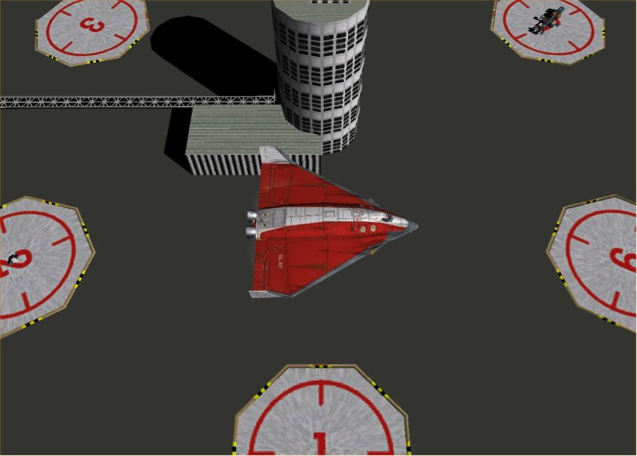
Welcome to Brighton Beach, our first and so far only Moon base! There’s not much water, true, but you can still get a tan. OK, it’s just an astronaut’s tan (a visor shaped area around the eyes). The base is not as small as it looks from up here – in addition to the tower and the six landing pads you see, there are six underground levels. Quite a bit of living space, but not much of a view down below. There is a McDonald’s on level U3 South. Yeah, they are everywhere. Tastes the same too.
Preflight & Com
OK, time to get started. You will still be flying the Delta Glider, though its wings and streamlined shape won’t help you here. There’s no atmosphere on this rock. But the DG is also a great hover machine with powerful thrusters. Today will be basic hover (VTOL for Vertical Takeoff and Landing), thruster, and surface-referenced navigation exercises using the Surface HUD and the Surface MFD. You won’t be going very far or very fast – its thrusters and hover-engines only within 500 meters of the base.
- Start Orbiter, open the Delta-Glider folder on the Scenario tab of the Launchpad, and launch the scenario “Brighton Beach.”
- The scenario starts with a ground-based view from the tower. Press F2 to switch to a target-relative view and move the camera in close to have a look at the DG sitting on Pad-04. The F2 key will cycle through the common external views; you can use the Camera dialog (from the F4 main menu or CTRL-F1) to get more view options.
- Press F1 to go to the internal view, then F8 to cycle to the panel view. Use UP-ARROW to raise your seat for a better view if you want.
- As in the Smack! scenario, you will use the MFD and control panel buttons to make it easier to set things up. In this scenario, you will also use the no-panel view for better ground visibility. Although buttons for almost all the common operations (MFDs and autopilot commands such as prograde) are also available on the no-panel view, a few are only on the panel, so use the panel for initial setup. In a real spacecraft or aircraft, you would also have made a thorough external preflight inspection, and used a checklist to make sure every switch and gauge in the cockpit is correctly set. But you get to skip that step in a PC simulator.
- Click the left [SEL] button to display the list of MFDs and select [Surface] from the list.
- It doesn't really matter which MFD you use for what. The scenario starts with the VOR/VTOL (Landing) MFD on the left displaying “No signal.” You will open this MFD on the right after you set up the radio beacon frequencies for your pads.
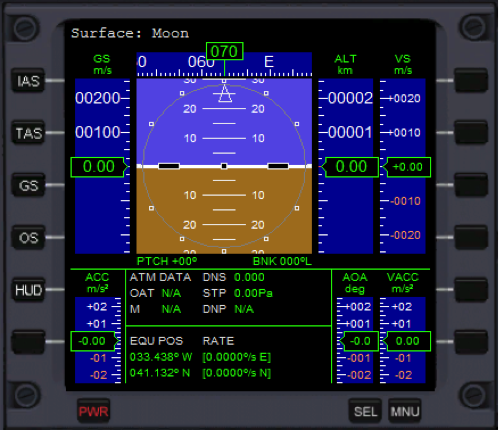
- The Surface MFD displays important information about your orientation (pitch and bank or roll) as well as Ground Speed (GS, m/s – you can actually configure this for other types of speed, see the Orbiter manual), altitude (ALT, km), vertical speed (VS, m/s, plus is moving up, minus is moving down), acceleration (ACC, m/s2, current “G-force” where 1G is about 10 m/s2). There is also some atmosphere information that’s not applicable here (marked N/A). EQU POS and RATE can be useful – they show your current ground position (latitude and longitude) and how it is changing. AOA is angle of attack (only needed in air). VACC is vertical acceleration in m/s2. It reads zero on the ground, but in flight it will tell you how much you are accelerating up (+) or down (-), and in lunar free fall, it will read -1.62 m/s2, the Moon’s gravitational acceleration.
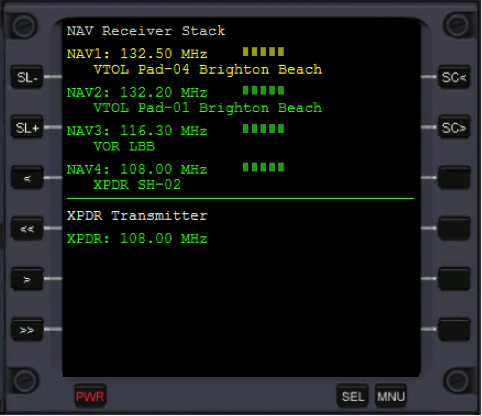
- On the right MFD, click [SEL] then [COM/NAV] so you can tune the radio beacons for the landing pads.
- Use the [<<] and [>>] buttons to tune the NAV1 frequency (top one, highlighted yellow) to 132-something, then use the [<] and [>] buttons to tune the fractional part to get 132.50 kHz (kilohertz) (you can also use the [SC<] and [SC>] buttons to scan for active frequencies). The text should say “VTOL Pad-04 Brighton Beach.” Next use the [SL+] button to highlight NAV2 and similarly tune it to 132.20 kHz, the frequency for Pad-01 (needed later). Finally click [SL+] again and tune NAV3 to 116.3 kHz which is the long-range VOR beacon for Brighton Beach (LBB), just in case.
- On the right MFD, click [SEL] then [VOR/VTOL] – it should now indicate that it is receiving the signal from Pad-04 (if not, click [NAV] until it does).
- Since you are sitting on Pad-04, the MFD should show distance (DIST) 0.0, horizontal (ground) speed (HSPD) 0.0, vertical speed (VSPD) 0.0, and altitude (ALT) 2.57 m (the pad is slightly raised above the average lunar surface level). The set of circles indicates distance from the pad center, the inner circle indicating (10 m), with green to indicate you are within the pad radius. The green cross shows the position of the center of the pad, and the yellow arrow shows the direction of your ground speed.
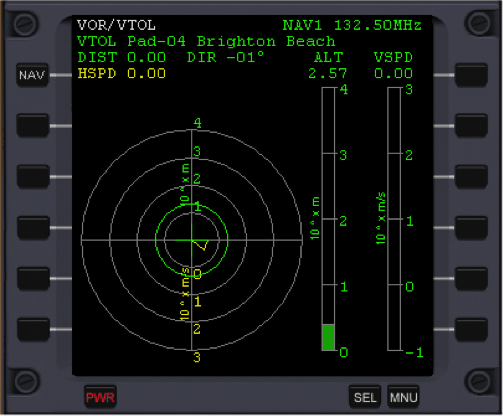
- (If your MFD doesn't show NAV1 and Pad-04, click the [NAV] button until it does.)
- The vertical bars graphically show ALT and VSPD. For VSPD, green indicates increasing altitude (i.e., rising), yellow indicates a safely decreasing altitude (descent, i.e., falling), and red indicates an unsafe rate of descent (i.e., slow down or crash!). This instrument can help you take off and land safely even when you can’t see the pad.
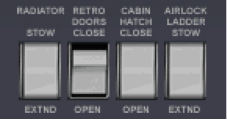
- Open the Retro Doors by clicking the lower half of the white RETRO DOORS button on the lower right side of the panel.
- This allows the forward-aimed retro engines (mounted in the leading edges of the wings) to be used if needed. You should not use main OR retro engines for this exercise, but if you get yourself going a bit too fast with the translation thrusters, you might need a quick burst of forward (main) or reverse (retro) thrust to slow down quicker. You can also open retro doors with a dialog box (Control-Spacebar).
Thruster Briefing
OK, time for the thruster briefing. You probably heard it all before, but pay attention anyway. You can’t imagine the number of student pilots who say “but I thought it was in linear mode” when explaining why they missed the pad by 300 meters.
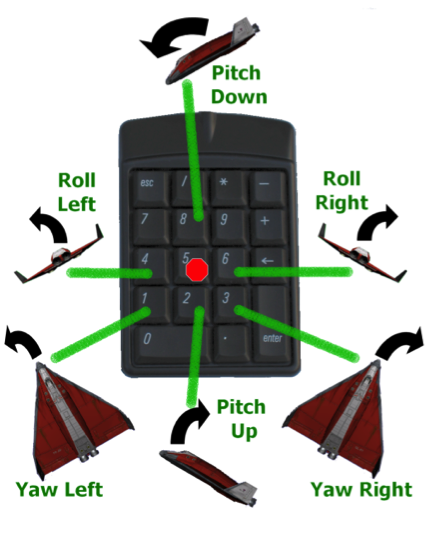
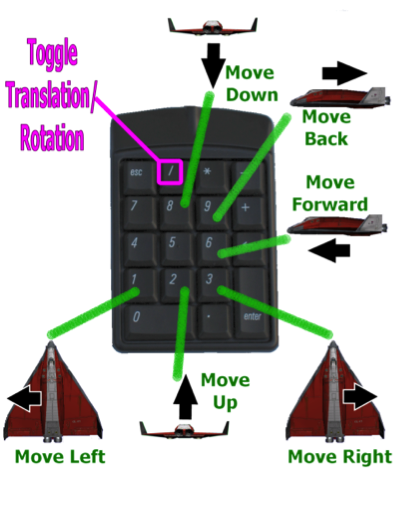
Thrusters in Orbiter are controlled by the numeric keypad (you can use a joystick, but the keypad is generally more precise and useful, except for atmospheric flight on Earth). There are two modes, rotation and translation, and the mode is controlled with the keypad / key. You used translation mode a bit in chapter 2 (remember the 6 and 9 keys for forward and back?). Start with rotation mode, checking out the diagram below. Note that rotation occurs around the spacecraft’s center of gravity (CG), which you can think of as its balance point.
Remember: Press the KEYPAD-/ key to toggle (switch) modes back and forth between rotation and translation.
Note that there is no standard “kill translation” autopilot as there is for “kill rotation” (there is an add-on MFD that does this and some other cool functions, the Attitude MFD).
Now remember, you still have gravity here (1/6th of Earth, light, but you still know which way is down), but there’s no air. And no air means no air friction (drag). Once you are hovering or flying, when you apply thrusters, you are applying forces which will move parts of the spacecraft in certain directions. When thruster pairs fire in the same direction, the whole spacecraft moves in the opposite direction (so to shift or translate RIGHT, the thrusters on the LEFT side will fire). When thrusters are fired in “crossed” pairs (say left in front, right in back), the front of the ship moves RIGHT, the back of the ship moves LEFT, and as long as it doesn’t bend (it won’t), you rotate or YAW to the right.
No friction – And what about that “no friction” thing? Of course that means that once you start moving or rotating in some direction, you will keep moving or rotating that way at a constant speed, unless you add or subtract another force. When flying on Earth or with a ground-rolling vehicle, air or ground friction provides the force that slows you down – you have to keep applying thrust or other power to keep going. For vertical motion near a planet or moon, gravity provides a force that pulls you down, and you need to apply vertical thrust to compensate (for hover) or exceed (for takeoff or launch) that gravitational force. Today you will be using the automatic hover A and automatic level L settings which will keep you “floating” at a constant altitude and level with the ground, with the upward force from the hover engines’ thrust exactly compensating for the downward force or “pull” of gravity. Then you will use your left, right, front, and rear thrusters to move your DG around in a simple pattern around Brighton Beach.
So once you are in hover, you will use thrusters (NOT main engines) to start moving, but how will you stop moving? Hit the brakes? NO, you know better than that – brakes work by friction, and you only have wheel brakes anyway. The only way to stop the motion from a force you apply with a thruster is to apply an equal force in the opposite direction. You saw that in the Smack! scenario with the forward 6 and rear 9 thrusters in translation mode. Same thing here, except you will need to combine rotations and translations to get around the simple course.
Lost in Translation – Stopping any rotation is pretty simple – just use the Kill Rotation button (5 num), but stopping translation is a different matter. The trick is to keep it slow at first, to try as much as possible to only apply thrust in one direction at a time, and to not rotate until you have canceled out that translation. Why? Because when you rotate, your thrusters will point in new directions, and it’s hard to apply canceling thrust that is exactly opposite your original thrust. With practice, you will develop a better feel for the combined motions, although it’s always better to think in “components” – left/right, up/down, forward/back, and to try to solve one problem at a time. If you just try random thruster directions, you may end up moving fast in some unexpected direction – lost in translation, so to speak (you can try a burst in the direction you think you need and see how the velocity changes – if it was the wrong way, press the key for the opposite direction to “take out” this test input). You will quickly learn that the direction you are pointing and the direction you are moving are completely independent.
When you are near a pad and receiving its radio beacon signal, the VOR/VTOL MFD helps you a lot by showing you the distance and direction to the pad center, as well as the direction and value of your horizontal speed. You can use this to figure out how to cancel out that speed when you need to.
HUD Stuff
HUD stands for Head Up Display, which is an optical projector system that displays computer generated symbols and even images on a special transparent panel in front of the pilot. This system has been used in military fighters and other aircraft for many years because it allows the pilot to keep his or her “head up” and looking for other aircraft while still seeing important information about speed, altitude, targets, etc. There are also helmet-mounted displays (HMD) that allow the pilot to see the information while looking in any direction (in panel view, the Orbiter HUD is a little like an HMD because you can see HUD symbols over the panel – virtual cockpit mode shows the HUD most accurately). In Orbiter, the HUD has three modes which are switched with the H key or with panel buttons in some spacecraft (and special transfer-to-HUD buttons on the Surface, Orbit, and Docking MFDs).
The three HUD modes are Surface, Orbit, and Dock. You’ve seen a little of the Dock mode in the Smack! scenario. This chapter mostly uses the Surface mode. When you display the panel, the surface HUD is displayed in its most basic form. In no-panel view, more information is displayed in the upper left corner to make up for the lack of panel (fuel, thrust level, RCS mode, etc.).
The basic information you need now is:
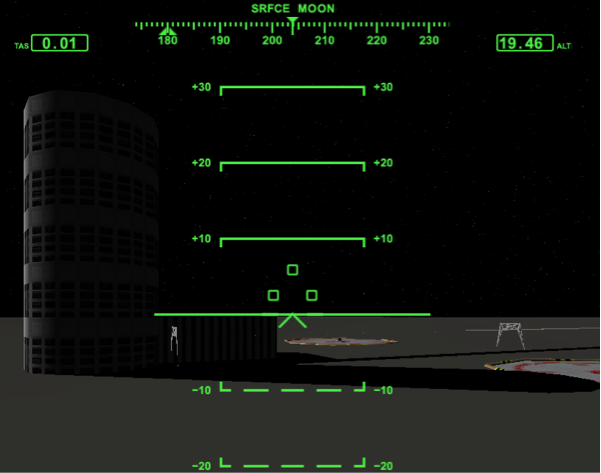
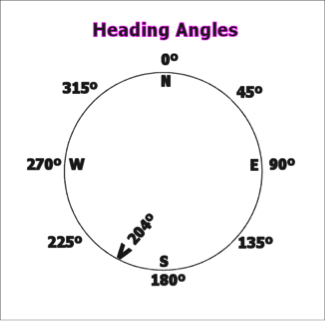
Heading ribbon – This is at the very top of the HUD and shows the direction your ship’s nose is pointing (not necessarily the direction you are moving). It’s basically a compass with north = 0º (or equivalently 360º since it “wraps around”), east =90º, south=180º, and west=270º. The heading ribbon shows these directions as 000, 090, 180, and 270, and of course intermediate directions are there too (e.g., southeast would be 135º, halfway between 130 and 140 on the ribbon). Small tick marks are in 1º steps. In the picture above, the heading caret (small solid v at top) is pointing at 204º, 24º west of south. If there is a target base defined, a small triangle beneath the heading ribbon, shows its direction (in this case, it’s the center of Brighton Beach, and the triangle is right above the tower building at 180º).
Velocity (speed) and Altitude boxes – The boxed number to the left of the heading ribbon is your ground speed, regardless of direction (i.e., could be moving forward, sideways, backwards, etc.), even though it is labeled TAS (true air speed only applies in the Earth’s atmosphere, but for SRFCE mode on the Moon, this is actually ground speed). The box on the right labeled ALT shows altitude in meters above the average surface level (note: the Surface MFD altitude is displayed in km, 1000 meters).
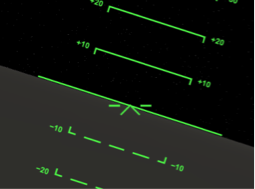
Pitch ladder – The set of parallel lines in the center is called the pitch ladder, though it also shows your roll (or bank). The spacecraft itself is shown as a fixed “airplane” symbol, an inverted V with two short horizontal lines like wings. The pitch ladder lines are numbered in steps of 10º from 0º (which is level pitch – note that you are level in the picture above with the zero line along the Moon’s horizon). Positive values are nose-up pitch, with +90º being straight up. Negative values are nose down (with dashed pitch lines). Roll or bank is shown by left and right tilting of the lines. If you roll left, the ladder lines tilt (like the horizon outside) to the RIGHT. Think of the little airplane symbol as your spacecraft and the pitch ladder zero line as the horizon and you’ll get the picture. Here’s what a roll of about 20º to the left looks like (pitch is still level at 0º):
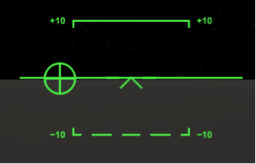
Yaw is not directly shown but you can see it if you have forward motion so that the “velocity vector” (VV, the ⊕ symbol, sometimes called the flight path indicator) is visible right in front (note that you will only see this if your speed is at least 1 m/s and in the forward direction). If you then yaw RIGHT, the ⊕ will move LEFT of the airplane reference symbol as shown below.
The Velocity Vector is very useful because it shows exactly the point in space that you are moving toward. Keep the ⊕ on a particular point on the ground, and you will go there (but it’s up to you whether you arrive there under control!). Note: the VV is defined a bit differently in the Docking HUD mode.
Three More Things: The triangle of three green boxes in the center of the HUD tells you that the landing gear are down. When you retract the gear with the handle on the lower panel (or press G), the boxes will flash while the gear are in motion. When they are safely stowed, the boxes disappear. No air drag on the Moon, so no real need to retract, but if you DO retract the landing gear, remember to extend them again to land! This is also done with G.
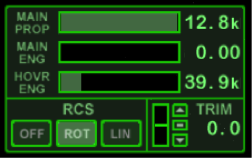
Takeoff, Hover, Move, Land
The first step in this exercise is to go into a low hover. You can use the mouse with the hover engine throttle on the left side of the panel, but since you will need to go to the “no panel” view for better visibility, you should just get used to the keypad for this. The no-panel view also has an “expanded HUD” in the upper left corner which displays the thrust level for each engine (main or hover) in Newtons (N, metric unit for force). How much hover thrust do you need to hover? Enough to overcome the Moon’s gravitational acceleration of a= -1.622 m/s2. For a vehicle mass of 24,500 kg (the approximate mass of the DG in this scenario – you can find the current mass in the Info dialog box, Control-i), the formula F = ma gives (24,500 kg)(1.622 m/s2) = 39,739 N (39.7 kN – this is about 8,900 lbf, pounds-force, of thrust). So you will need more than this thrust to take off, and about this much to maintain hover (you’ll need less as you burn fuel and your mass goes down, but auto-hover will manage this for you once you reach your desired altitude). Since the hover thrusters can generate 220 kN, you only need about 20% throttle to lift off from the Moon.
- Go to no-panel view (•)
- Start hover engines by tapping the keypad-0 key several times until the HOVR ENG thrust value on the HUD reads about 40.0k (use keypad-. to decrease thrust), and also press the L key to engage auto-leveling.
- You can also press the HOR LVL button. The Moon’s gravitational constant is 1.622 m/s2, about 1/6th that of Earth (9.8 m/s2), so you need to apply hover engine thrust that exceeds this value as calculated above. Auto-level helps to keep the hover thrust precisely vertical so you don’t drift off the pad (if you roll or pitch the spacecraft, you can get a small component of sideways thrust from the hover engines). Keep thrust low so you rise slowly, trying not to overshoot.
- When your altitude reaches about 20 m, press the A key to engage auto-hover.
- You can also press the HOLD ALT button. Altitude (in meters with the usual letter tags, k for kilo, etc.) is in a box labeled ALT at the top center-right of the HUD display. For comparison, the tower at Brighton Beach is 100 m high. Auto-hover will try to hold you at the altitude displayed when you hit the A key. If you are rising fast, it will cut the engines and let you (eventually) free-fall back to the target altitude. If you are falling fast, it may apply full hover thrust to overcome the downward acceleration (there isn’t always enough power to do this in time!). But once it reaches the target altitude and achieves near-zero vertical speed (VS on the Surface MFD), it will automatically adjust hover thrust over a small range to maintain altitude.
- Make sure you are in ROTATION mode, and start a slow yaw to the LEFT.
- In the upper left corner of the no-panel view are buttons for RCS (reaction control system) as shown above. You can click these buttons or toggle linear/rotation with the keypad-/ key and (with Orbiter Sound installed) you will hear the confirming voice say “rotation” (ROT) or “translation” (LIN for “linear motion”) – it’s important to be sure of your RCS mode before pressing any thruster keys. Yaw left is the keypad-1 key in rotation mode.
- Stop your rotation when you reach a heading of 90 degrees.
- Yes, I know left is the long way around from a 70º to a 90º heading (this is your clearing turn, done for safety before leaving the pad). You can use opposite thruster to stop, or use the Kill Rotation (KEYPAD-5) key.
- Switch to LINEAR mode (keypad-/), and move about 50 meters to the LEFT, keeping your speed under 5 m/s.
- Use the KEYPAD-1 key to start this, watching the DIST value on the VTOL MFD for a value of 50, then use opposite thrust (the KEYPAD-3 key) to zero out your horizontal velocity. Note how the length and direction of the arrow on the MFD change as you move away from the pad.
- Use ROTATION to point your nose back at Pad-04, then use LINEAR as needed to move and get centered (DIST = 0.0) and stopped over the pad.
- As you get close, you will lose sight of the pad under the nose and will need to rely upon the VOR/VTOL MFD to determine when you are centered over the pad.
- Once over the pad, press A to turn off auto-hover, and apply hover thrust KEYPAD-0 (up) and KEYPAD-. (down) to slowly drop back onto the pad.
- Keep an eye on the VS (vertical speed) in the Surface MFD to keep a small negative (downward) speed as you descend to the pad (below –1.0 m/s). You should also use the VOR/VTOL MFD vertical speed bar – the VSPD value should be small and the bar yellow (not red) for a safe descent speed. Be sure auto-level is still active and only use front/back (6/9) and left/right (1/3) translation (plus hover engines). Congratulations, you landed!
Moving to a New Pad
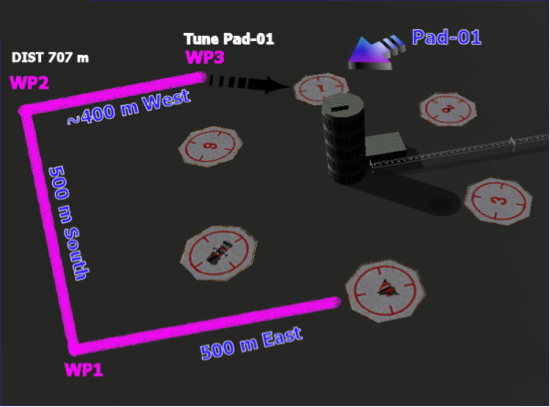
Follow the diagram below to fly a low-hover pattern from Pad-04 to Pad-01. Note that you should not go directly to it (the tower is in the way!); you need to go around the base area. Here are the basic steps, quite similar to the steps above, but you need to pay attention to your heading and distance from Pad-01, and stop at each waypoint (WP1, WP2, WP3 in the diagram below).
- Go back to the panel view (cycle •) and check that the frequency for the Pad-04 radio beacon is still selected.
- If it’s not, click [NAV] on the VTOL MFD to re-select the frequency (should be NAV1).
- Lift off with hover thrust as before, use auto-level (L) and auto-hover (A) to hold 20 m altitude.
- Use the VOR/VTOL MFD for guidance with rotation and linear thrusters as needed to follow the course as shown in the diagram.
- Start with rotation mode and turn to your initial heading of 90º, then use Translation to thrust forward at less than 10 m/s (remember to start reverse thrusters early enough to slow down and stop without overshooting the waypoint). Stay within the defined course and distances to avoid losing the pad radio signal. WP3 is actually "abeam" Pad-06 (i.e., stop when Pad-06 is directly to your right).
- TIP: You can "turn your head" in the cockpit with the mouse by holding down the right mouse button. Return to the front view with the H (home) key. This is more realistic looking in the virtual cockpit view but works in the other cockpit views too.
- When you reach WP3 on the diagram, hover and hold position while you switch the landing MFD com to the Pad-01 frequency.
- Use the [NAV] button or RIGHT-SHIFT-N to cycle through the four nav frequencies.
- Use the front view and Pad-01 signal to go directly to the new pad and land.
- Use the arrow's length and direction and DIST value on the MFD to get as close as possible to the center of the pad before landing (pad is big, but DIST 0.0 is the goal).
Once Around the Block (First Orbit)
So now you’ve got the feel of the hover thing, and you want to orbit. OK, one quick trip around the Moon, then back to Pad-01. Since you pretty much know what to look for now, I’ll outline the procedures in a bit less detail than before. We call this the elevator takeoff and it's really kinda fun.
- Start out the same as before, go into a hover at about 20 m and make a clearing turn the long way around to 90° degrees heading (make sure auto-level L is engaged so you don't drift away from the pad).
- A 90° launch azimuth (heading) gives you the most velocity from the Moon’s rotation (not much actually, the Moon rotates pretty slowly, so it’s only carrying us east at 3.5 m/s) and also gives you the minimum orbital inclination (tilt of your orbit with respect to the equator), which for 90° launch azimuth is equal to the latitude of your launch point (41.1° in this case). This is important because that inclination will bring you right back over the base on your first orbit, when you better plan to land. Aim for exactly 90° heading.
- Switch to the Orbit MFD on the right, then click [PRJ] button (projection) to display SHP and also click the [DST] button to display altitude.
- You can also restore the panel view (•) if you like, though all the important buttons are also available on the no-panel view. ”Projection ship” (SHP) displays the orbit information relative to your own ship’s orbital plane. DST will display altitude (Alt, PeA, ApA) above the surface rather than radius from the Moon’s center (Rad, PeR, ApR).
- After final pre-orbit checks, apply full hover thrust (A to kill the hover hold then keypad 0 to maximum) and watch your altitude in the HUD.
- Just make sure auto-level is still on and your heading is exactly 90°.
- When ALT reaches 2000 m, hit the R key to slow time to 0.1x and get ready to use the mouse to quickly increase your main engine throttles to maximum and drag your hover throttle to zero thrust as soon as you reach 2200 m.
- Why? You want to quickly turn on maximum horizontal thrust (to build orbit speed quickly) and simultaneously cut the hover thrust to zero. Unlike with the main engines which have the special “cut engines” KEYPAD-* (*) key, there is no single key to cut the hover thrust. It’s not essential to switch engines simultaneously, but it makes it a little easier to get a good orbit without a very high apoapsis. Slow-motion is optional though – if you’ve got video game mouse skills, there’s no need to use 0.1x.
- Then press T to return to normal (1x) time.
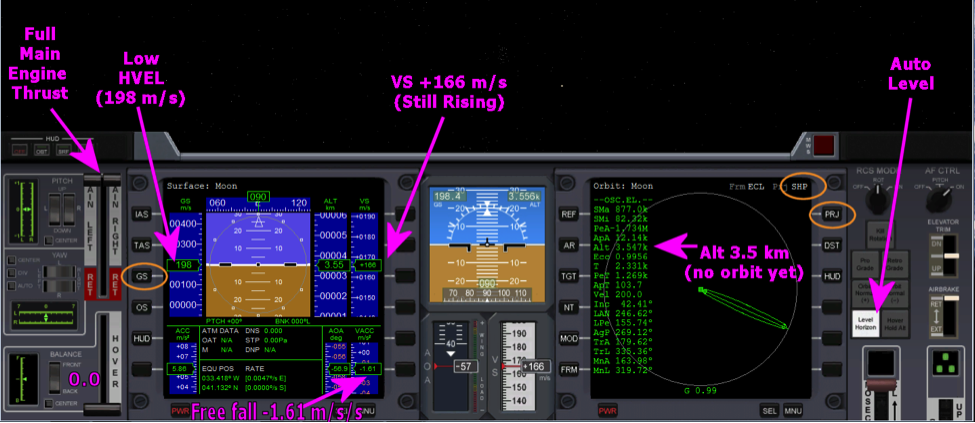
- The picture below is just after hover engine cutoff (but still rising) and full main thrust has been applied, with horizontal velocity (GS on Surface MFD) still low.
Still rising? Yes, even after cutting the hover thrust, you will continue to rise – just like throwing a ball in the air, it rises until gravity overcomes the upward velocity you gave the ball with your arm. Notice in the Surface MFD that after hover engine cutoff (HECO), the vertical acceleration (VACC) will show -1.6 m/s2 (free fall on Moon), while vertical speed (VS) will drop to zero and then become negative (falling). Your spacecraft will reach a maximum height then start to fall – but in the meantime, your main engines are building up the horizontal speed needed to achieve orbit – which means you will continue to fall, but you will also go forward fast enough to “stay ahead” of the Moon’s downward-curving surface as you are pulled towards its center by gravity, so you “fall around” the Moon, which is what an orbit is, just a very long fall (see Chapter 10, “I Was Just Wondering…” for more on this).
- When your eccentricity (Ecc on the Orbit MFD) gets to about 0.05 or smaller, press the R key to again slow down time to 0.1x.
- Slow motion is again optional but will allow you to better see when the Ecc value reaches its smallest value and starts to rise again. When it does, MECO! This stands for “main engine cutoff” and you can do it by quickly pulling the main engine throttles down to zero power with the mouse (if you have the panel up), or by pressing the KEYPAD-* (*) key.
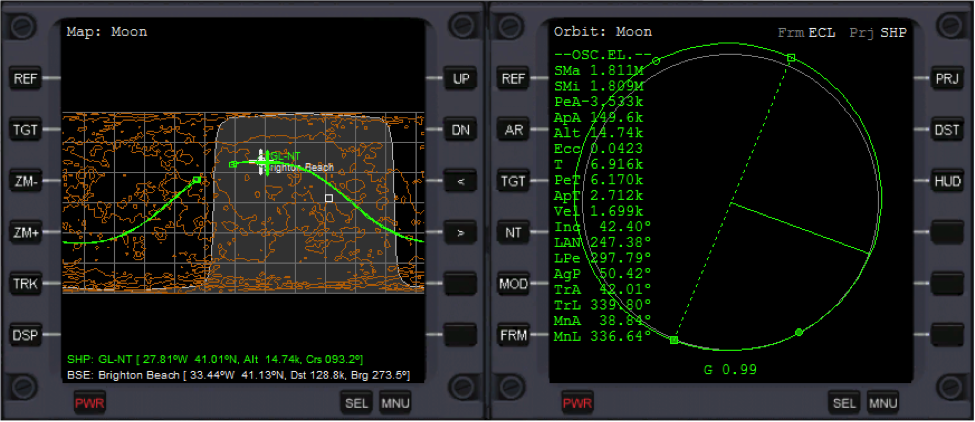
Is your orbit good enough? Probably not. Your apoapsis should be OK (ApA 40-200 km depending on when you did MECO). But periapsis altitude is probably still negative (note the gap in the orbital path on the Map MFD above, and the negative PeA on the Orbit MFD). Even if this occurs near Brighton Beach where you need to land, you will want to start with positive PeA, 20-30 km to avoid terrain (though planet and moon surfaces in Orbiter are actually smooth). Do you remember what to do from Chapter 2?
- That’s right, a few seconds before apoapsis (watch ApT for the number of seconds to go), make a prograde burn to raise the periapsis.
- If you are in no-panel, use the PRO GRD button or the [ key (left square bracket) to start the prograde autopilot. It doesn’t matter if this orbit is not quite circular since you plan to de-orbit (i.e., slow down and land) after the first orbit anyway. Burn until you raise PeA to 25-30 km (probably just a few short bursts of the main engine, the KEYPAD-+ key). Vel will probably be about 1600-1700 m/s, varying slightly since the orbit won’t be quite circular.
Your first lunar orbit will go fast (especially if you use time acceleration). The view is not actually that great when you’re moving fast down low, but you’ll be busy preparing for your de-orbit burn anyway.
This would be a good time to try out the orbit mode of the HUD. Press H until you see Orbit: Moon at the top of the Orbiter window (you can also click the [HUD] button on the Orbit MFD to transfer its settings to the HUD). In orbit mode, the “pitch ladder” is referenced to your orbital plane instead of the planet surface. This allows you to manually position for pro grade, retro grade, and other special attitudes (though you can still use the auto-pilot buttons for the basic ones). When you are prograde, the velocity vector symbol (circle with plus sign in it) is directly in front of you (there is also a retrograde HUD symbol, a circle with a dot in it). Note that the Orbit HUD does not display altitude or velocity as does the Surface HUD. If you need this information while viewing the Orbit HUD, display the Surface MFD which lets you choose to display ground speed (GS), orbital speed (OS), and a couple of atmospheric (airspeed) options that don’t apply on the airless Moon.Bringing It All Back Home (De-orbit)
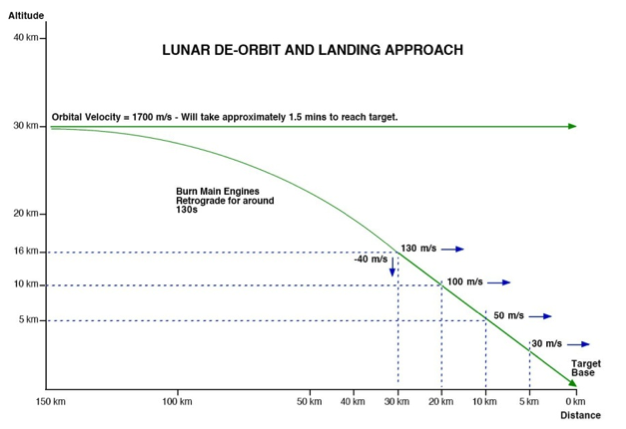
Time to think about the de-orbit procedure. De-orbit (or reentry) is basically simple – burn in the retro direction to slow down, then fly back to the pad. The trick is knowing when to slow down and by how much! On Earth, you’ve got a nice thick atmosphere to slow you down and provide lift when you get down low enough (this is why the Space Shuttle can slow down and glide to a landing with no power after the initial retro reentry burn). But reentry on Earth is also tricky, because friction with the air heats up the spacecraft, and this has to be controlled with precise flying. On the Moon, there’s no atmosphere to help or hurt you, but the DG’s powerful hover engines can control the rate of descent, while the main engines are used (retro) to kill most of your orbital speed. In this case, you will start the full-power de-orbit burn when you reach 150 km distance from Brighton Beach. This works pretty well in this case, and the diagram below summarizes the approach. See the next chapter for a simple physics-based (formula) method to figure out when to start slowing down.
You can think of three phases for the de-orbit procedure:
- Phase One: Prepare MFDs, determine what things to watch, turn retrograde for the burn.
- Phase Two: Burn to a slow enough approach speed, turn prograde and level, slow your descent.
- Phase Three: “Get down” to the pad by managing your direction, speed, and descent rate.
- Phase One, Prepare: First configure your MFDs.
- You will need to change these a couple of times as things happen. Start out with the Map MFD (use [SEL] button and click [Map]) and the Orbit MFD ([SEL] and [Orbit]). You need to set your target base on the Map MFD. Click the [TGT] button, then use arrow keys to choose Spaceports and Brighton Beach.
- Turn off any autopilots (prograde or auto-level) and use T to bump time acceleration up to 10x or 100x (remember R to slow down time).
- The period of your orbit will be over 6000 seconds (100 minutes), so speed up time a bit until the distance (Dst) to Brighton Beach is about 300 km or so on the Map MFD. Your orbit path on the Map should go right through the base circle for Brighton Beach (if it doesn’t, you didn’t have a 90° heading when you fired main engines to enter orbit). If it’s only off a little, you may still be able to make it back (or change orbital planes to line it up, see next chapter). Otherwise, start over with the takeoff and aim for exactly 90°.
- Slow to real time (1x) when you get about 300 km or so from the base.
- Note that this is given by the Dst: figure on the Map MFD.
- Immediately click the Retro Grade RETRO GRD button, or press RIGHT SQUARE BRACKET (]), in preparation for the de-orbit burn.
- Turning retrograde means aiming your engines in the direction you are moving so they will slow you down when you fire them (flying tail-first). At 1700 m/s, it only takes about one minute to go 100 km (100,000 m ÷ 1700 m/s = 59 s), so start to turn retro right away.
- Switch the Map MFD to the VOR/VTOL MFD and select NAV3.
- Click [SEL] then [VOR/VTOL] and [NAV] to get to NAV3. NAV3 is the VOR beacon for Brighton Beach (LBB, 116.3 MHz) which you programmed in early in the tutorial “just in case.” The VOR has a range of 500 km so you should be receiving it now, giving you distance and directional information more conveniently than the Map MFD.
- Switch the Orbit MFD to the Surface MFD (click [SEL] then [Surface]).
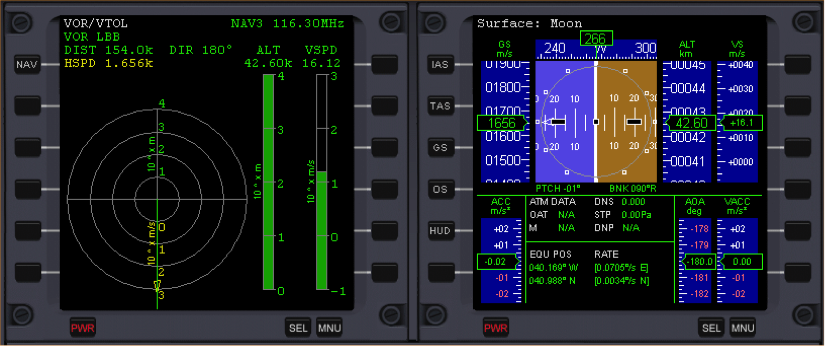
- The Orbit MFD won’t be too useful once you slow down enough to de-orbit, and the Surface MFD shows you ground speed (GS) and vertical speed (VS, with negative values indicating descent). This will allow you to keep the Orbit HUD up which will be useful in a few moments. The picture below is just before the retro burn, 154 km from base, which is directly behind us, moving at 1656 m/s (orbital speed).
- Phase Two, Burn & Turn: When you reach about 150 km from base on the VOR/VTOL MFD (DIST), apply full main engine thrust.
- Drag the main engine throttles to the top if you are in panel view. If you are in no-panel, hold down the KEYPAD-+ key, touch the CTRL key, then release both to quickly lock in full power. How did we get 150 km? Orbital speed (about 1700 m/s) and F = ma again (or a = F/m in this case). Using CTRL-I (Info) you can find that main engine thrust is 320 kN (320,000 Newtons) and that the mass of the spacecraft is around 24,000 kg (at the point I checked). Divide the force (thrust) by the mass, and you get around 13 m/s2 of (negative) acceleration. With this full thrust acceleration value during the retro burn, you will lose ~13 m/s for each second you fire the engine in the retro direction. You can divide your speed (in m/s) by this value to estimate the burn time, 1700/13 = 131 seconds (over 2 minutes - your speed and acceleration will be somewhat different depending on your orbit, amount of fuel, etc.).
- If you go from 1700 m/s to zero over some distance, your average speed will be about 850 m/s or 0.85 km/s, and using D = vt (distance = velocity x time), the approximate stopping distance will be (0.85)(131) = or 112 km. Things happen fast when you get ready to land, so use 150 km to allow a little more time than the minimum needed to slow down (you actually won’t drive speed to zero just yet).
- Keep burning until the velocity (ground speed) shown on the Surface MFD reads close to 130 m/s, then cut your main engines (MECO).
- Drag throttles to zero or press KEYPAD-*. This should put you ~40-50 km from base.
- Press R to slow time to 0.1x , click the Pro Grade button, and switch back to Orbit HUD (H) if it is not there already (upper left should say Orbit [Moon]).
- The ship will slowly start to turn to pro grade. The Orbit HUD is needed so you can tell when you are very close to pro grade so you can kill rotation and start to level the spacecraft as soon as possible (you need to get the hover engines facing down to slow the descent). You can correct your lineup with the base a little later.
- Turn off the panel if it’s displayed (•) and press X a few times to “zoom out” to a wider field of view (FoV 70° should work well).
- FoV is shown in the upper right corner. A wider FoV along with no-panel allows better downward visibility for approach and landing. A FoV of 90° shows the most but also distorts the view and distances, something like a fisheye lens or a car’s side mirror.
- Press T for 1x time, wait for Pro Grade to nearly complete, then Kill Rotation (keypad-5), press L to roll level, and show Surface HUD (H).
- You want to be pretty close to the pro grade direction, but you really need to get the hover engines facing down as soon as possible so they can start to slow your descent. You don’t need to be exactly pro grade now, just looking toward the base as shown in the labeled picture on the next page (yaw left or right if needed to point near the heading ribbon’s triangle base indicator if you can’t see the VV – slight rotation in this case).
- Phase Three, Get Down: As soon as you are level (or very close), start adding hover thrust with keypad-0, but keep VS negative (i.e., keep going down).
- You will probably need quite a lot of downward thrust at first, because you will see in the Surface MFD that your VS (vertical speed) is pretty large and negative (e.g., -135 m/s), and you don’t want to lose too much altitude yet. This causes your velocity vector (⊕ symbol) to be below you and out of sight even with no panel and a wide FOV. You want VS to be negative (going down since you are landing), but you want a much smaller number. You also want to get the ⊕ symbol on or near the base (remember, the ⊕ shows the point you are moving toward, and Brighton Beach would be a good choice now). On the VOR/VTOL MFD, a red VSPD bar will remind you if you are falling too fast (yellow is OK).
- Remember that KEYPAD-0 increases hover thrust (slows descent) and KEYPAD-. decreases thrust. You will need to constantly use these two keys.
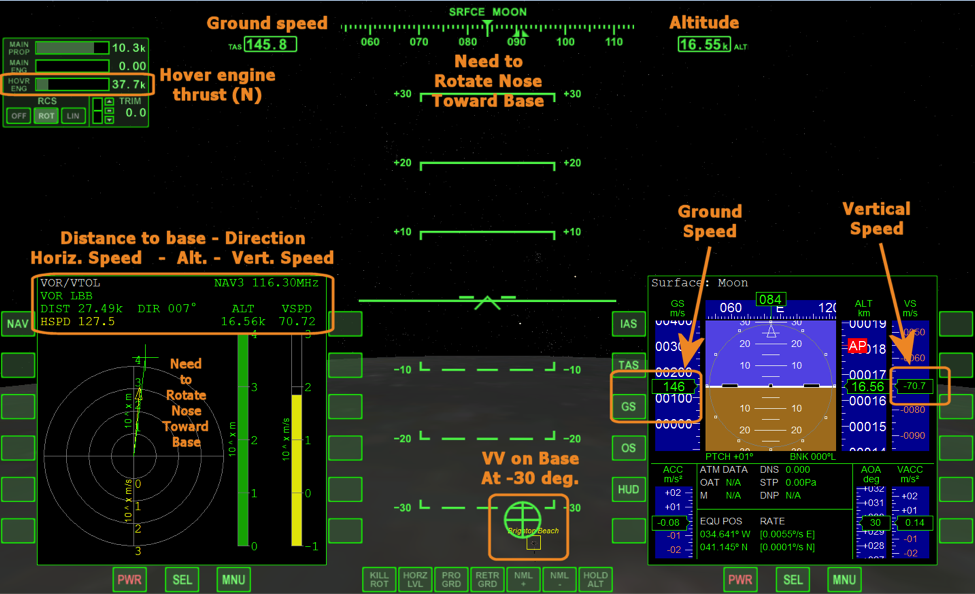
- In this no-panel shot, we have already applied hover thrust to slow our descent. We are level in pitch but descending at -70.7 m/s (VS) with ground speed 146 m/s (GS), 16.6 km altitude, 27.5 km from base (roughly half rule OK). We have zoomed out (X) to FoV 70° and the base is in sight and close to the desired -30° pitch line (30 degrees down). We are applying 37.7 N of hover thrust at the moment (about lunar G of -1.6 m/s2 for m = 23,000 kg). The nose is aimed a little to the left of the base, with both the VV and the direction indicator on the VOR/VTOL MFD showing the need to rotate right to line up with the VOR signal direction (though we are moving toward the base since the VV is very close to it).
- Click or press Pause (CTRL-P) and read the following “landing plan.”
The Roughly Half Plan – Now that you are level and have slowed the descent for the ride back to Brighton Beach, you need to plan your final approach. While the basic idea is to keep the VV on the base, you may need some guidance on how to do this. You have four main things to work with:
- Main engines (probably not needed any more unless you decide to “re-orbit”)
- Hover engines (very important control)
- Retro engines (important for slowing down as you get closer)
- Thrusters (important for directional control and fine-tuning the descent)
How can you use these controls to keep everything “happy?” There are various ways that will work, but to start with, a rule of thumb might help. If you keep your altitude roughly one-half of your distance to the base, and also keep vertical speed (VS on Surface MFD) at roughly one-half of ground speed (GS on Surface MFD), this will give a controllable descent until you are within 3-5 km of the base. As long as you didn’t start too high (25-45 km should be OK), this “half the distance” rule should keep Brighton Beach at just about -30° on the Surface HUD, which will be visible near the bottom of the screen (in no-panel view with 70° FoV). In the picture above, the “half rule” is OK for altitude and distance (16.6 km altitude, 27.5 km distance) and for velocity (-70.7 m/s for GS of 146 m/s is pretty good), and you can see that the ⊕ symbol is very close to the target base. Remember, this is the roughly half rule, so don’t worry if things drift off a bit – don’t “chase the numbers” to try to keep them exact. You have some time to make corrections, and you have powerful engines. Pause or slow down time if you need to think about it.
Note that as you get closer to the base, you will want to use retro engines (KEYPAD-- key as long as retro doors are open) to start to slow down so you arrive near the base at maybe 10-20 m/s ground speed which you can quickly burn off at the last minute. But note that as you decrease your forward speed, you will also have to decrease your descent (VS) as well to follow the “roughly half” plan. Actually if you keep Brighton Base at the -30° line and keep the ⊕ symbol mostly on it, the velocity part should be OK.
- Use keypad hover keys 0 and . to keep the ⊕ (VV) on or near the base.
- Try to follow the roughly half rule as you do this.
- Use translation thrusters (mainly left/right) to move the VV onto the base if it drifts right or left.
- It needn’t be exact since you can correct it later, but you want to keep the base in sight and keep moving toward it.
- Use rotation thrusters (mainly yaw) to keep the nose aligned with the VV.
- Not essential but it helps to keep the base and the VV both in sight if they are front and center. If the VV is on the base but the base isn’t straight ahead, you are moving toward the based but not pointing at it (as in the picture above); yaw to correct.
- If you get confused and can’t even see the VV, press A (also kill rotation, KEYPAD-5, if necessary) and L to auto-hover and auto level.
- This will stop your descent as long as you aren’t too low and descending too fast (if this happens, you will hit the surface – quit and start over from your Quick Saved starting point or the beginning if necessary). It isn’t especially fuel efficient, but you can worry about that another time. It also will not stop your horizontal motion (you can use retro engines and linear thrusters for that). With these, you can even stop and hover at high altitude while you figure out where the base is and whether to continue or start over.
- When distance to base is less than 50 km, switch the VOR/VTOL MFD to NAV2 with the [NAV] button.
- This is the frequency for Pad-01. The MFD gives distance to base (DIST), horizontal speed (HSPD), vertical speed (VSPD), and direction arrow as in hover practice.
- When you get within 20 km from the base, slow down to about 100 m/s ground speed.
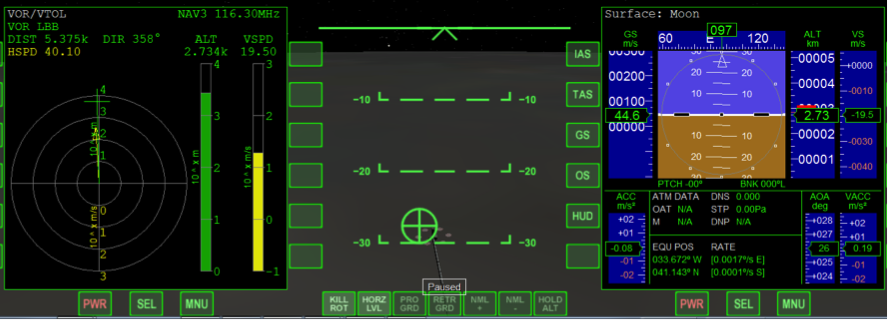
- Use your retro engines (KEYPAD-- key). You will also need to adjust hover engines to keep the VV on the base. In the picture below, we are 5.4 km from the base at 45 m/s ground speed. The VV is on the base, the target (+) and yellow direction of motion arrow on the VOR/VTOL MFD (LBB still selected) are nearly straight ahead (up), altitude is roughly half of distance (2.7 km vs. 5.4 km), vertical speed (VS) is about half of ground speed (-19.5 m/s vs. 44.6 m/s), so everything is pretty “happy” in this situation.
- When you get about 5 km from the base, slow to about 30 m/s ground speed.
- Use retro engines and slow your VS accordingly with hover engines to keep the VV on the base. You should be at about 2.5 km (2500 m) altitude at this point and will soon hear a voice say “twenty-five hundred.” This is landing assistance from Orbiter Sound (based only on altitude, it will call out lower altitudes more often starting with 1000 m).
- Lower landing gear with G if you raised the gear earlier.
- Recall that the HUD will show three small squares in a triangle shape when gear are down (these will flash when gear is in motion). You can also see the status of the gear and raise or lower it with the control on the lower panel (SHIFT-DOWN-ARROW) if the panel is displayed, or just use the G key.
- Within 1-2 km of the base, slow down to 10 m/s.
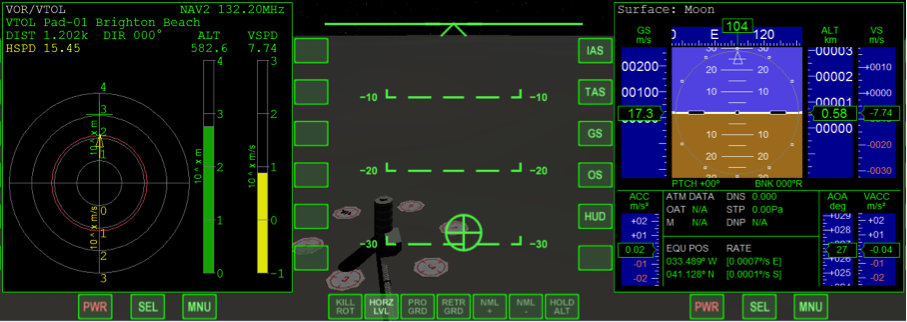
- At 500-1000 m altitude, the base should look pretty big, and it should start to look and feel much like hover practice. Use auto-hover and auto-level from here if you like, and maneuver over the pad just like before (except a little higher up). In the picture below, we are still fast but about to slow down for final approach. Note the values: 1.2 km DIST, 583 m ALT, 15.5 m/s HSPD, 7.7 m/s VSPD down, with VV moving toward Pad-01 (I’ve used the [NAV] button to switch to the Pad-01 transponder).
- Use your Landing MFD to guide you back to Pad-01 and land.
- Remember that even with the no-panel view and the widest FoV, the pad eventually disappears under the nose, and you will need to use the VOR/VTOL and Surface MFDs to get centered on the pad and land. You made it back!
Summary of Steps (Hovering at the Beach)
- Preflight and Com
1. Start Orbiter, open the Delta-Glider folder on the Scenario tab of the Launchpad, and launch the scenario “Brighton Beach.”
2. Press ¡ to go to the internal view, then • to cycle to the panel view.
3. Select the Surface MFD on the left with [SEL] and [Surface]
4. Select the COM/NAV MFD ([SEL] [COM/NAV]) and tune the navigation radio frequencies NAV1 to 132.50, NAV2 to 132.20, NAV3 to 116.3.
5. On the left, select the VOR/VTOL MFD ([SEL] [VOR/VTOL]) – it should now show the signal from Pad-04.
6. Open the Retro Doors (button on lower right of main panel, or use Control-Space bar for dialog).
- Thrusters – See diagrams on page 3-5.
- Takeoff, Hover, Move, Land
7. Press • until you are in the no-panel view.
8. Press L for auto-level and tap keypad 0 key to get value of 40.0k (Newtons) for hover thrust.
9. At altitude of 20 m, press A to engage auto-hover.
10. In rotation mode (KEYPAD-/ to toggle), yaw left (the long way around as a clearing turn, KEYPAD-1) to a heading of 90 degrees (use Kill Rotation button or KEYPAD-5 to stop).
11. In translation mode (KEYPAD-/ to toggle), translate (move) left 50 m (KEYPAD-1 to start, KEYPAD-3 to stop). Toggle modes and rotate (yaw, KEYPAD-1 or KEYPAD-3) to point nose at Pad-04, then use translation thrusters (toggle KEYPAD-/ then KEYPAD-6 forward and KEYPAD-9 back) to move back to the pad.
12. When stopped over the pad, press A to release auto-hover, then alternate hover thruster keys (KEYPAD-0 for plus and KEYPAD-. for minus) to slowly drop to the pad.
- Moving to a New Pad
13. In panel view •, check that Pad-04 radio beacon is still active on VOR/VTOL MFD.
14. Lift off with hover engines and hold 20 m altitude with A and L as before.
15. Use translation and rotation thrusters as needed to follow the diagram on page 3-11 to Pad-01.
- Once Around the Block (Orbit)
16. Takeoff, auto-level L, auto-hover A at 20 m as before, and rotate to exactly 90° heading.
17. Restore panel view (cycle •) and switch to the Orbit MFD on the right, then click [PRJ] button (projection) to display SHP and also click the [DST] button to display altitude values.
18. Disengage auto-hover A and apply full hover thrust 0 num – then press R to slow time when altitude reaches 2000 m.
19. When altitude reaches 2200 m, pull hover engine throttle to zero thrust and push main engine throttles to full thrust. Then restore 1x time with T.
20. When eccentricity (Ecc on the Orbit MFD) reaches about 0.05, press R to slow time to 0.1x. Watch the slowly dropping Ecc value and when it starts to rise, kill main engine thrust (* num ). Periapsis (PeA) will probably be negative and will require a small burn at apoapsis to raise this. Accelerate time if desired to ApT ~ 60 s and turn Pro Grade (panel button).
21. When you are close to apoapsis (ApT ~ 10 s), use + num to fire 2 or 3 very short bursts of main engine thrust to raise PeA to 25-30 km (use retro engine - num to adjust if you overshoot this).
- Bringing It All Back Home (De-orbit)
22. Select the Map MFD, click [TGT], and define target base as Brighton Beach. Place or keep the Orbit MFD on the other side for now.
23. Accelerate time (T) until Map MFD shows distance (Dst) to Brighton Beach (BB) as ~300 km. Then restore normal time R and immediately turn Retro Grade (panel button) for de-orbit burn.
24. Replace the Map MFD with the VOR/VTOL MFD and use [NAV] to select NAV3 (LBB), and also replace the Orbit MFD with the Surface MFD.
25. When you reach 150 km, push main engine throttles to full thrust for ~2 minute burn until ground speed (GS) on Surface MFD is reduced to about 130, then cut main engines (* num). Slow time to 0.1x (R ).
26. Immediately click the Pro Grade button (starts in slow motion) and switch to Orbit HUD (use H) if it is not already displayed.
27. Switch to no-panel view (cycle •) and press X a couple of times to get wider-angle FoV 70° for better landing view.
28. Restore normal time T, wait for Pro Grade to nearly complete, Kill Rotation (5 num), press L to roll level, and cycle back to Surface HUD H. If you should lose sight of the velocity vector (⊕ symbol), yaw left or right (1num or 3num) to point the nose at the base direction indicator (triangle) on the heading ribbon.
29. As soon as you are close to level, start applying hover thrust (0 num increase, . num decrease) to slow your descent. It may take a lot of thrust at first, but VS should stay negative (i.e., don’t start to rise).
30. For final approach, try to keep Brighton Beach at about -30° on the Surface HUD, and the VV (⊕ symbol) on or very close to the base. Also try to keep altitude at about ½ the distance to the base as shown on the Map MFD or (soon) the VOR/VTOL MFD.
31. Use translation thrusters (mostly lateral, 1 num and 3 num) to center the VV on the base, and rotation thrusters (mostly yaw, 1 num and 3 num) to keep the nose left-right aligned with VV. The pitch should still be level (nose position indicator at 0° pitch line) though the VV will be below the 0° pitch line (at around -30°). The nose should not be pointing down at the base (attitude is level, but flight path is sloping down as you slowly lose altitude).
32. Within 30 km of the base, you should have the pad-01 radio beacon, so switch VOR/VTOL frequency to NAV2.
33. Within 20 km, slow to about 100 m/s, and at 5 km, slow to ~30 m/s, slowing descent to maintain the “roughly half” rule (VS about half of GS, and altitude about half of distance). Use retro engines (- num) to slow down, and hover engines to keep VV on the base as you do.
34. Within 5 km of the base, use G to lower your landing gear if you raised them earlier.
35. Within 1-2 km of the base, slow to 10 m/s or slower, stopping when you are over the pad. Use auto-hover A and auto-level L to get stable over the pad, use LIN thrusters to adjust your position over the pad, then turn off altitude hover-hold A and use hover engines to lower the ship slowly onto the pad.
| Chapter 2: Smack! Rescue | GPIS Contents | Chapter 4: Fly Me To The Moon |
