Difference between revisions of "GPIS 1: Before You Get Started"
(Original from GPIS 3rd edition) |
(Category sorting.) |
||
| (6 intermediate revisions by 5 users not shown) | |||
| Line 1: | Line 1: | ||
| + | |||
{| class="wikitable" width="100%" | {| class="wikitable" width="100%" | ||
|style="text-align:left" width="33%" | [[GPIS_Introduction|GPIS Introduction]] | |style="text-align:left" width="33%" | [[GPIS_Introduction|GPIS Introduction]] | ||
| Line 38: | Line 39: | ||
If you have the requirements above, you can download the Orbiter files and get started. You will download and save the files to a directory on your PC. But first you have to find them. Note that web sites '''DO''' change, so use Google (www.google.com) to search if a site mentioned seems not to work. | If you have the requirements above, you can download the Orbiter files and get started. You will download and save the files to a directory on your PC. But first you have to find them. Note that web sites '''DO''' change, so use Google (www.google.com) to search if a site mentioned seems not to work. | ||
| − | * '''Go to | + | * '''Go to the Orbiter homepage''' - The central web site for Orbiter is maintained by its creator, Dr. Martin Schweiger, http://orbit.medphys.ucl.ac.uk. This web site has a lot of information about Orbiter including FAQ’s and descriptions of the latest versions and updates (the Gallery page also has a lot of great screen shots) . This site does not directly host the download files for Orbiter, but it includes links (on the Download page) to several “mirror” web sites that do host the Orbiter files (there are still other web sites for the many add-ons developed for Orbiter, but you should start out with the basics for now – except for Orbiter Sound). |
| − | * '''Mirror Sites''' – Read any notes on the Download page of | + | * '''Mirror Sites''' – Read any notes on the Download page of orbit.medphys.ucl.ac.uk, choose a mirror site, and read any notes there before downloading. Note that the files are named by release date (e.g., orbiter060426_base.zip would be Base Files of April 26, 2006 – shown as 06mmdd below). |
* '''Basic Distribution''' ('''Base''' file zipped ~50 MB, unpacked ~120 MB, contains the basic, required Orbiter files, orbiter06mmdd_base.zip) – Install and try the basic files before installing extensions or add-ons. Note that the Orbiter SDK is only needed if you plan to make your own add-ons. | * '''Basic Distribution''' ('''Base''' file zipped ~50 MB, unpacked ~120 MB, contains the basic, required Orbiter files, orbiter06mmdd_base.zip) – Install and try the basic files before installing extensions or add-ons. Note that the Orbiter SDK is only needed if you plan to make your own add-ons. | ||
| Line 126: | Line 127: | ||
'''TIP:''' You should try to “think metric,” but if you need to, you can roughly double m/s values to get mph (a better estimate is to multiply the m/s value by 2.2 to get miles/hour). | '''TIP:''' You should try to “think metric,” but if you need to, you can roughly double m/s values to get mph (a better estimate is to multiply the m/s value by 2.2 to get miles/hour). | ||
| − | Because Orbiter has to display a wide range of numbers, from fractions of a meter or a few seconds, to millions of meters, it has a special form of “scientific notation” using letters. In this system, '''k''' means thousands ( | + | Because Orbiter has to display a wide range of numbers, from fractions of a meter or a few seconds, to millions of meters, it has a special form of “scientific notation” using letters. In this system, '''k''' means thousands (10^3, i.e., 10 to the third power), '''M''' means millions (10^6), and '''G''' means billions (10^9). For example, the distance from New York to Paris is 5,793,638 meters, which is 5793.7 kilometers (km) or 3600 miles. Orbiter would display this as '''5.7937M''' (read this as 5.7937 '''M'''illion meters – a million meters is 1,000 kilometers). Time periods in seconds can seem odd when they get large, but just remember that there are 60 seconds in a minute, 3600 seconds ('''3.600k''') per hour, 86,400 ('''86.400k''') seconds per day. One week = 7 days = 604,800 s ('''604.8k'''). One month = 30 days = 2,592,000 s ('''2.5920M'''). You’ll get used to it (but you may want to keep a calculator handy at first!). We sometimes need to discuss mass and force (or thrust). The metric unit for mass is kilogram (kg) and the unit of force or thrust is the Newton (N) rather than pounds which are commonly used (rather confusingly) for both mass and force in the English system of units. |
'''Time and Date''' – Orbiter expresses date and time as '''UT''' (Universal Time, sometimes called Zulu time), which is the time of day (and date) in Greenwich, England (near London). This system is also used by airplane pilots because when everyone uses the time in a standard single place for everything, it reduces problems with and confusion over time zone differences. Orbiter also uses a system based on counting days and fractions of a day (the fractions give the time) called “Modified Julian Date” or '''MJD'''. MJD is the number of days since a particular reference day. It makes many orbital calculations easier (and is used in scenario files), but you don’t need to know much more about it now. | '''Time and Date''' – Orbiter expresses date and time as '''UT''' (Universal Time, sometimes called Zulu time), which is the time of day (and date) in Greenwich, England (near London). This system is also used by airplane pilots because when everyone uses the time in a standard single place for everything, it reduces problems with and confusion over time zone differences. Orbiter also uses a system based on counting days and fractions of a day (the fractions give the time) called “Modified Julian Date” or '''MJD'''. MJD is the number of days since a particular reference day. It makes many orbital calculations easier (and is used in scenario files), but you don’t need to know much more about it now. | ||
| Line 151: | Line 152: | ||
'''TIP:''' Keep in mind that it is nobody’s job to answer Orbiter questions on the Forum – members do this in their spare time to encourage and help people who share their interests in space flight and Orbiter. Please try to be polite and patient with your questions, and try to include enough information about your problem so an experienced person has a chance of figuring out what might be wrong. If you just say “it doesn’t work,” people have to guess what’s wrong and it’s frustrating for everyone. | '''TIP:''' Keep in mind that it is nobody’s job to answer Orbiter questions on the Forum – members do this in their spare time to encourage and help people who share their interests in space flight and Orbiter. Please try to be polite and patient with your questions, and try to include enough information about your problem so an experienced person has a chance of figuring out what might be wrong. If you just say “it doesn’t work,” people have to guess what’s wrong and it’s frustrating for everyone. | ||
| − | |||
| − | |||
{| class="wikitable" width="100%" | {| class="wikitable" width="100%" | ||
| Line 159: | Line 158: | ||
|style="text-align:right" width="33%" |[[GPIS_2:_Smack!_Rescue|Chapter 2: Smack! Rescue]] | |style="text-align:right" width="33%" |[[GPIS_2:_Smack!_Rescue|Chapter 2: Smack! Rescue]] | ||
|} | |} | ||
| + | |||
| + | [[Category:Tutorials|Go Play In Space 02]] | ||
| + | |||
| + | {{HasPrecis}} | ||
Revision as of 11:53, 19 July 2021
| GPIS Introduction | GPIS Contents | Chapter 2: Smack! Rescue |
Acknowledgement
This material was contributed by Bruce Irving from the 2nd edition of Go Play In Space. Refer to the page's View History tab to see subsequent changes.
Before You Get Started
The goal of this chapter is to help you get Orbiter installed and configured so you can quickly start to play. It will give basic information, tips, and advice but will refer you to the Orbiter manual for some details. Fortunately Orbiter is pretty easy to install and configure so you shouldn’t have too much trouble. Note that you will need a Windows-based PC (there is no Mac version of Orbiter). While you can make some installation and configuration choices to reduce the demands on your PC, and you don’t need the very latest and fastest PC and graphics accelerator card, Orbiter is a fairly complex real-time simulator with detailed 3D graphics. Some older PCs may not be able to keep up.
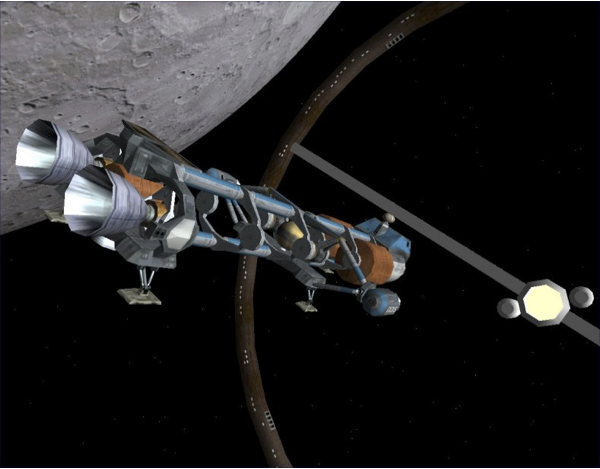
Before you install Orbiter on your PC, you will need to be sure you have what you need to succeed with the installation. That might start with getting permission to download and install some new software if the PC in question is your family or school PC, or if it is your PC, but family or school rules require getting permission. Orbiter is quite harmless – it is free software developed and released purely for educational and entertainment purposes, but you should follow the rules of your home or school (if you’re an adult reading this, you might not need permission, but give your parents a call anyway, they’ll be happy to hear from you – and tell them about Orbiter while you’re at it).
Orbiter is safe! Note that Orbiter is a better PC “citizen” than many commercial and even freeware or shareware PC programs – it installs its files only into the directory you specify, not into various Windows system directories as many programs do. This means the files generally will not affect other programs on your PC, and they can be removed when necessary by simply deleting the installation directory with all its files. This also means that you can easily have multiple installations of Orbiter on the same PC, which is useful when you want to try out different sets of add-ons (as long as you have disk space since each is at least 116 MB, up to 665 MB with all high-resolution files, before any add-ons!).
The information below is a summary of the important points and should help to get you going. If you have problems, first check the Orbiter manual. This file (orbiter.pdf) is installed with Orbiter in the /Doc folder, but you can also download the manual from the web before you even install Orbiter (go to www.orbitersim.com and click on the link labeled “Manual” – there are several download sites for this PDF file). See especially chapters 2 (Installation), 3 (the Launch Pad), and 5 (Getting Help).
What You Need
Here’s what you need to install Orbiter 2006. These are my guidelines, not absolute minimums – check the Orbiter web site and manual (orbiter.pdf) for the latest information on requirements. It’s always a good idea to review the installation page at www.orbitersim.com in case there have been changes or patches.
- A Windows PC (Windows 98, ME, 2000, XP – sorry, no Mac version) with at least 200 megabytes of free disk space. For best results with Orbiter 2006, your CPU speed should be 1 GHz or better, you should have at least 256 MB of RAM, and a graphics accelerator card with 32 MB or more graphics memory. Most PC’s sold since 2001 probably meet these guidelines, although in some, the built-in graphics accelerator may not be very good. You also need a fairly up to date version of Microsoft’s DirectX graphics utilities (search www.microsoft.com for directx – most commercial games will check and install a new version if needed, so you may be up to date already). If your PC can run graphics-heavy games such as The Sims, Halo, or Microsoft Flight Simulator OK, it should be OK for Orbiter. See the Orbiter manual for more details.
- A keyboard with a numeric keypad. Orbiter makes frequent use of the numeric keypad keys. Most desktop PCs include such a keypad as a standard part of the keyboard, but if you are using a notebook PC, you may not have such a keypad, or it may be “embedded” in the standard keys and require awkward shift keys to access. You can usually plug in an external keyboard to a notebook, and you can also buy separate numeric keypads that plug into the USB port.
Orbiter can also use a joy stick for some controls, which is most useful for flying in the atmosphere in airplane-like space craft. It’s nice to have, though in space operations, the keypad generally works better, and even for atmospheric flight, you can usually do OK with the keypad.
- A web connection to download the Orbiter files. These files are pretty large and could take quite a while to download if you are using a 56K dialup modem connection. Orbiter doesn’t require access to the Internet while it runs (it does not yet have any multiplayer capability, and even if it gets this in a future version, it would be optional to use).
- A Zip file application to “unzip” the compressed Orbiter files (file names of the form name.zip). Windows XP includes direct support for “zipped” (specially compressed) file archives. Other versions of Windows require use of a utility such as WinZip – you can find free evaluation versions or basic versions of this or other zip utilities on the Web (search Google for “free zip file utility”).
Downloading Orbiter Files
If you have the requirements above, you can download the Orbiter files and get started. You will download and save the files to a directory on your PC. But first you have to find them. Note that web sites DO change, so use Google (www.google.com) to search if a site mentioned seems not to work.
- Go to the Orbiter homepage - The central web site for Orbiter is maintained by its creator, Dr. Martin Schweiger, http://orbit.medphys.ucl.ac.uk. This web site has a lot of information about Orbiter including FAQ’s and descriptions of the latest versions and updates (the Gallery page also has a lot of great screen shots) . This site does not directly host the download files for Orbiter, but it includes links (on the Download page) to several “mirror” web sites that do host the Orbiter files (there are still other web sites for the many add-ons developed for Orbiter, but you should start out with the basics for now – except for Orbiter Sound).
- Mirror Sites – Read any notes on the Download page of orbit.medphys.ucl.ac.uk, choose a mirror site, and read any notes there before downloading. Note that the files are named by release date (e.g., orbiter060426_base.zip would be Base Files of April 26, 2006 – shown as 06mmdd below).
- Basic Distribution (Base file zipped ~50 MB, unpacked ~120 MB, contains the basic, required Orbiter files, orbiter06mmdd_base.zip) – Install and try the basic files before installing extensions or add-ons. Note that the Orbiter SDK is only needed if you plan to make your own add-ons.
- Planetary Extension Packages – These are optional but recommended if your PC is fast and has a good graphics card. High resolution texture files make the Earth and some other planets look much nicer, but new level 10 (L10) textures for Earth and Mars unpack to very large files.
- EarthL10(zip~79MB=> ~187MB,Earth06mmdd_L10.zip)
- Mars L10 (zip ~177 MB => ~256 MB, Mars06mmdd _L10.zip)
- Planets/Moons (zip ~69 MB => ~104 MB, individual files also available, PlanetHires06mmdd.zip)
- Vessel Extensions (very small files, hi-res textures for Delta Glider and Dragonfly ships – get these)
- Orbiter Sound 3.0 – This is an optional add-on, but it improves the Orbiter experience so much, it is essentially required. It adds a variety of sound effects and MP3 music support to Orbiter and is only available from “Dan’s Orbiter Page,” the web site of its author “DanSteph”:
http://orbiter.dansteph.com (click DOWNLOAD, then first download link, about 10.4 MB) The download file is an executable (OrbiterSound30.exe) file, not a Zip file – you must download and save the file, then after Orbiter is installed, run this executable file to install Orbiter Sound 3.0. (it has an installer but the installer does not write anything to the Windows Registry or other places, only to the Orbiter installation directory).
But wait! There’s actually no sound in space, right? - You’re right – above the Earth’s atmosphere, in the near-vacuum of space, there is nothing to carry sound waves, so no sound. But inside a piloted space craft, there is air, and there are lots of sounds and vibrations that carry through the metal parts of the craft and into the air around the astronauts, from the air conditioning fans, fuel pumps, reaction control thrusters, and other systems. There are also sounds from radio transmissions. And since external views in Orbiter often look like scenes from a space movie, why not have a sound track? Orbiter Sound 3.0 supports MP3 playback so you can replace the silence of space with your favorite tunes. Think of it as an MP3 player with 3D graphics. And rocket engines.
Installing from the Zip Files
Once you have the Zip files saved in a directory on your PC, you can install Orbiter.
- Create an installation directory (folder). You can do this anywhere on your PC, but most people put their programs under Program Files, often on the C: drive. In a Windows Explorer window, select the “parent” folder (e.g., C:\Program Files), choose File > New > Folder, and then type a name to replace the default name “New Folder” (e.g., Orbiter2006).
- Folders Are Very Important! Orbiter installation is a simple matter of extracting or copying the files from the compressed Zip file to the new directory where you want it to run. The most important point of this is to keep and use the directories that are defined inside the Zip file when you extract or copy the files in the Zip file. Orbiter depends on the files it needs being in the correct folders when it runs. If you are using WinZip, there is a check box in the Extract dialog that says “Use folder names” – you need to check this box. If you are using XP, Zip files look like folders. Select all the files AND subfolders in this (/Config, /Modules, /Textures, etc.) and drag them to the installation folder. This will preserve the directory structure as required.
- Extract the Files – Extract or copy the files and folders to your installation folder as described above for your Zip method. You will find a file orbiter.exe in the top level of your installation folder. You can double click this file to launch Orbiter.
- Make a Desktop Shortcut – To avoid having to open the installation folder whenever you want to run Orbiter, you can make a desktop shortcut icon. Right click on the file orbiter.exe and choose Send To > Desktop (Create Shortcut) from the pop-up menu. Then you can launch Orbiter by double clicking the new desktop shortcut.
- Install Orbiter Sound – Once Orbiter is installed, you can install Orbiter Sound 3.0 as well. Go to the folder where you saved OrbiterSound30.exe and double click to run it. It will prompt you to locate the folder where Orbiter is installed. Click the Browse... button and locate the Orbiter installation folder, then click the button that appears, Install OrbiterSound 3.0, and wait. The installer will install all the needed folders and files and will prompt you for how to customize your sound levels and features (optional for now, its defaults will work without customization).
- Tip: Save Your Install Files! – If you really get involved with Orbiter, you will probably need to reinstall it someday, perhaps after installing a troublesome add-on (most add-ons work well, but some don’t). It will be much easier if you save (on your hard drive and/or burned to CD) the installation Zip files, as well as the Orbiter Sound installation program and any other add-ons you download and would like to keep. It’s also a good idea to save a copy of the entire basic Orbiter installation folder once it’s installed and you are sure it is working. You can save it on the hard drive or on a CD as a quick way to get back to a working configuration if an add-on or an accidentally deleted file causes things to break.
Run and Configure Orbiter (Launchpad Settings)
Double click orbiter.exe or your desktop shortcut to run Orbiter – it starts out with a tabbed dialog box called Orbiter Launchpad. You need to check and probably change some of the settings Orbiter will use, at least the first time (Orbiter remembers your settings for subsequent sessions). For details of all settings, see Chapter 3 of the Orbiter.pdf manual (in the /Doc folder).
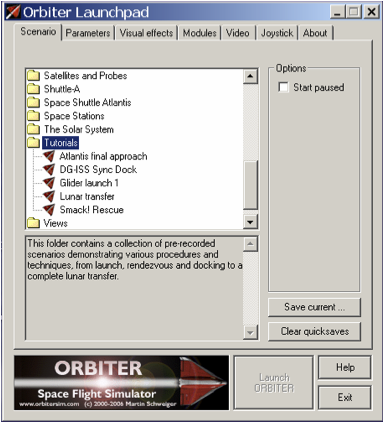
Scenario Tab – This is more or less the “home screen” when you start Orbiter. Here are listed scenario files you can run, most of them organized into folders by spacecraft type or theme. Double click a folder to open it. Most folders and scenarios have explanatory text that shows up below the list. Quicksaves are scenarios saved by you while running Orbiter (using Control-S). The basic procedure is:
- Locate and click on a scenario file to select it
- Click the Launch ORBITER button
The Save current... button is used just after you quit
a scenario you’d like to use again someday.
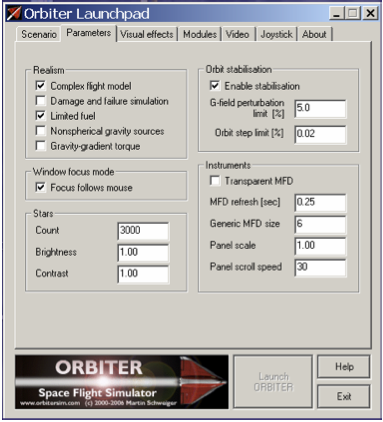
Parameters control various aspects of the simulation. Default settings are mostly OK (you should keep Complex flight model and Limited fuel checked – it’s really better this way), but don’t use Nonspherical gravity or Gravity-gradient torque just yet. Two useful but optional changes:
- Stars – Defaults (shown) are OK, but 4000 stars with Brightness 0.9 and Contrast 4.0 may look better than the default settings.
- MFD refresh rate – MFDs are the two “computer screen” instruments on the panel. Change to 0.25 sec (default is 1 sec) for more responsive updating, helpful with getting more accurate engine burn times.
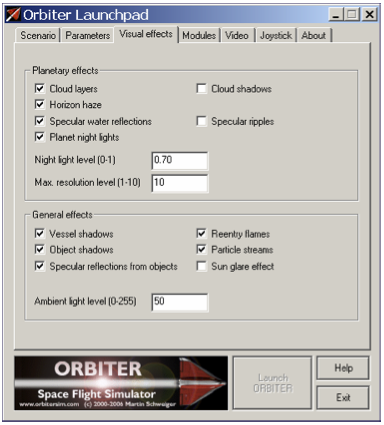
Visual effects are cool, but some of them can hurt the frame rate on a PC without a good enough graphics card. These settings work well for me, although “Specular water reflections” can sometimes make the earth a bit too plastic/shiny looking. It’s all up to your taste and frame rate tolerance. Try the settings here (essentially default settings) and see how they work for you. You may have to do some trial and error if your frame rate is hit badly.
Ambient light level determines how dark it is when it’s dark (e.g., planet night side). The default level (8) is realistically (really) dark, but for practical things like seeing the ISS for docking, or landing at night, a level like 50 can be very helpful and still fairly dark.
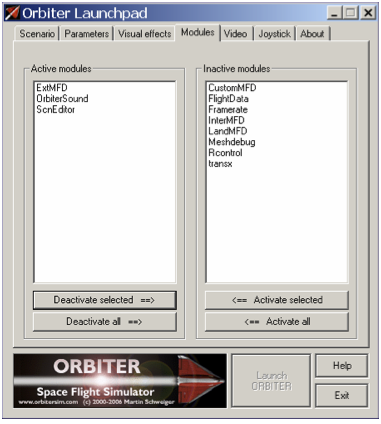
Modules are additional controls and MFDs that have been installed and can be activated on request from this tab before running a scenario. Using more active modules can mean more CPU time and a slower frame rate (screen update), so only activate what you need.
Add-ons such as Orbiter Sound will add more items on the right side. Orbiter Sound 3.0 works very efficiently with Orbiter, so you should install and activate it. If Orbiter Sound is still in your right “Inactive” list, click to select it, then click Activate selected (as shown).
Some modules are supplied (all shown here except InterMFD and LandMFD, which are add-ons). ExtMFD (allows additional MFDs) and ScnEditor (integrated scenario editor) are very useful and are active here.
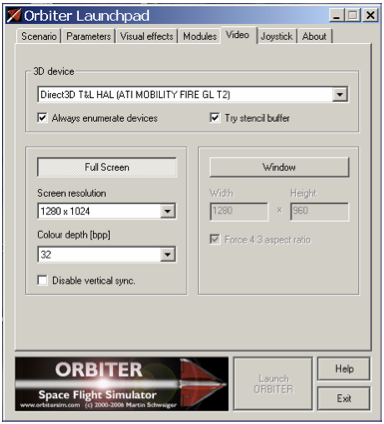
Video settings are very important to a good Orbiter experience. You usually want the highest resolution that your CPU, graphics card, and monitor can handle with a good frame rate. If you have a notebook or LCD monitor that is (say) 1280 x 1024, you should choose that same Screen resolution setting here for best picture quality. Use 32 bit Colour Depth if your graphics card allows (better looking planets).
Try settings like the ones shown, and if you have problems, refer to Chapter 3 of the Orbiter PDF manual. It may save a little time and flashing to run Orbiter in the same resolution you normally use in Windows (even on a CRT), since otherwise the system has to reset video modes when you start and stop Orbiter, but use what looks best and runs well.
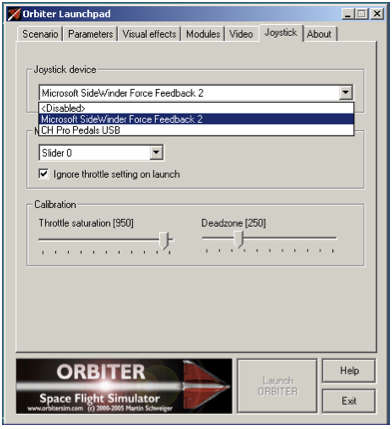
Joystick settings are made on this tab. If you have any joysticks installed that are recognized by Windows, they should show up here. These settings work OK for the Microsoft stick listed here. If you don’t have a joystick, don’t worry much – the keypad works better for most things anyway (with the exception of airplane-like flight inside the atmosphere, when a joystick “just feels right,” especially for scenarios like “Atlantis Final Approach,” which is in the Space Shuttle Atlantis folder, with an annotated playback version in the Tutorials folder).
TIP: When using just the keyboard/keypad, if you get odd effects like a spacecraft that won’t stop rotating, check to see if your joystick or its throttle is jammed against something, giving a series of “commanded” actions you don’t know about.
About Numbers, Units, and Time
One thing you will notice about Orbiter is that in addition to nice graphics, it displays a lot of numbers. Orbiter uses the metric system exclusively. Distances are in meters (abbreviated m), velocity (speed) is in meters/second (m/s), and lengths of time are in seconds (s or sec). If you are not that familiar with metric values, note that a meter is a little over 3 feet, and 1 mile is about 1600 m. For velocity, 1 m/s is the speed of a slow walk, 30 m/s is about highway driving speed (67 mph or 108 kph), and 200 m/s is about the speed of a (slightly slow) jet airliner (447 mph or 720 kph).
TIP: You should try to “think metric,” but if you need to, you can roughly double m/s values to get mph (a better estimate is to multiply the m/s value by 2.2 to get miles/hour).
Because Orbiter has to display a wide range of numbers, from fractions of a meter or a few seconds, to millions of meters, it has a special form of “scientific notation” using letters. In this system, k means thousands (10^3, i.e., 10 to the third power), M means millions (10^6), and G means billions (10^9). For example, the distance from New York to Paris is 5,793,638 meters, which is 5793.7 kilometers (km) or 3600 miles. Orbiter would display this as 5.7937M (read this as 5.7937 Million meters – a million meters is 1,000 kilometers). Time periods in seconds can seem odd when they get large, but just remember that there are 60 seconds in a minute, 3600 seconds (3.600k) per hour, 86,400 (86.400k) seconds per day. One week = 7 days = 604,800 s (604.8k). One month = 30 days = 2,592,000 s (2.5920M). You’ll get used to it (but you may want to keep a calculator handy at first!). We sometimes need to discuss mass and force (or thrust). The metric unit for mass is kilogram (kg) and the unit of force or thrust is the Newton (N) rather than pounds which are commonly used (rather confusingly) for both mass and force in the English system of units.
Time and Date – Orbiter expresses date and time as UT (Universal Time, sometimes called Zulu time), which is the time of day (and date) in Greenwich, England (near London). This system is also used by airplane pilots because when everyone uses the time in a standard single place for everything, it reduces problems with and confusion over time zone differences. Orbiter also uses a system based on counting days and fractions of a day (the fractions give the time) called “Modified Julian Date” or MJD. MJD is the number of days since a particular reference day. It makes many orbital calculations easier (and is used in scenario files), but you don’t need to know much more about it now.
Running Orbiter
Once it’s installed and configured, running Orbiter is easy. Double-click the orbiter.exe file in the installation folder or the desktop shortcut you created (see “Run and Configure” above for more info).
From the Launchpad, choose a scenario to run, then click the Launch Orbiter button (it’s grayed-out until you select a scenario). With a default installation, the load time should be pretty fast. Hi-resolution textures and various add-ons (when you choose to install them) can make the load time take longer.
Quitting Orbiter
From Launchpad – To quit from the Launchpad, just click the [Exit] button.
From Inside Orbiter Itself – If you have launched a scenario and want to quit, you have to at least wait for the scenario to finish loading, and then you can press F4 for the main menu and click [Exit], or you can type a alt-F4 or ctrl-Q to exit directly
Getting Help
The first place to look for help is in the Orbiter help files and/or documentation. The Orbiter manual (orbiter.pdf in the installation /Doc folder) is the key reference and is quite thorough (you need the free Acrobat Reader, www.adobe.com) . Help files have a lot of useful information you can even access while running the sim (from the main menu F4).
If you have looked in the manual and are still stuck, you can try the Orbiter Web Forum (click the Web Forum link on www.orbitersim.com to reach the forum). You can use the Search link on the forum to search for past questions and answers, and you can also register and post questions in the forum. Also be sure to check the two or three “sticky” posts that stay at the top of the list (including one about FAQs – many people have the same basic questions). If you are using add-ons, you can also check the Addons Forum. As a freeware program, Orbiter has no official support, but members of the Forum are pretty friendly and will usually respond to reasonable and polite questions from “newbies.”
TIP: Keep in mind that it is nobody’s job to answer Orbiter questions on the Forum – members do this in their spare time to encourage and help people who share their interests in space flight and Orbiter. Please try to be polite and patient with your questions, and try to include enough information about your problem so an experienced person has a chance of figuring out what might be wrong. If you just say “it doesn’t work,” people have to guess what’s wrong and it’s frustrating for everyone.
| GPIS Introduction | GPIS Contents | Chapter 2: Smack! Rescue |
Precis
This article has a precis and appears in the Random addon or Random article section on the Main Page. The precis can be found at GPIS 1: Before You Get Started/precis and is displayed below.
|
Go Play In Space, Chapter 1. Go Play In Space is the classic introduction to Orbiter for new orbinauts and those looking to expand their horizons. Chapter 1 will help you get up and running with a basic setup. (More...)
|
